Glitter Disney plush headbands are beloved for their whimsical charm, combining soft fabric, adorable character details, and shimmering accents that capture the magic of childhood—or the inner child in all of us. However, frequent wear, exposure to oils from hair and skin, and environmental dust can dull the sparkle and compromise the fabric’s integrity over time. Cleaning these delicate accessories requires a thoughtful approach: too aggressive, and you risk losing glitter or warping the shape; too passive, and grime builds up unnoticed. The good news is that with the right tools and techniques, you can safely restore your headband’s luster while preserving its structure and design.
Understanding Your Headband’s Materials
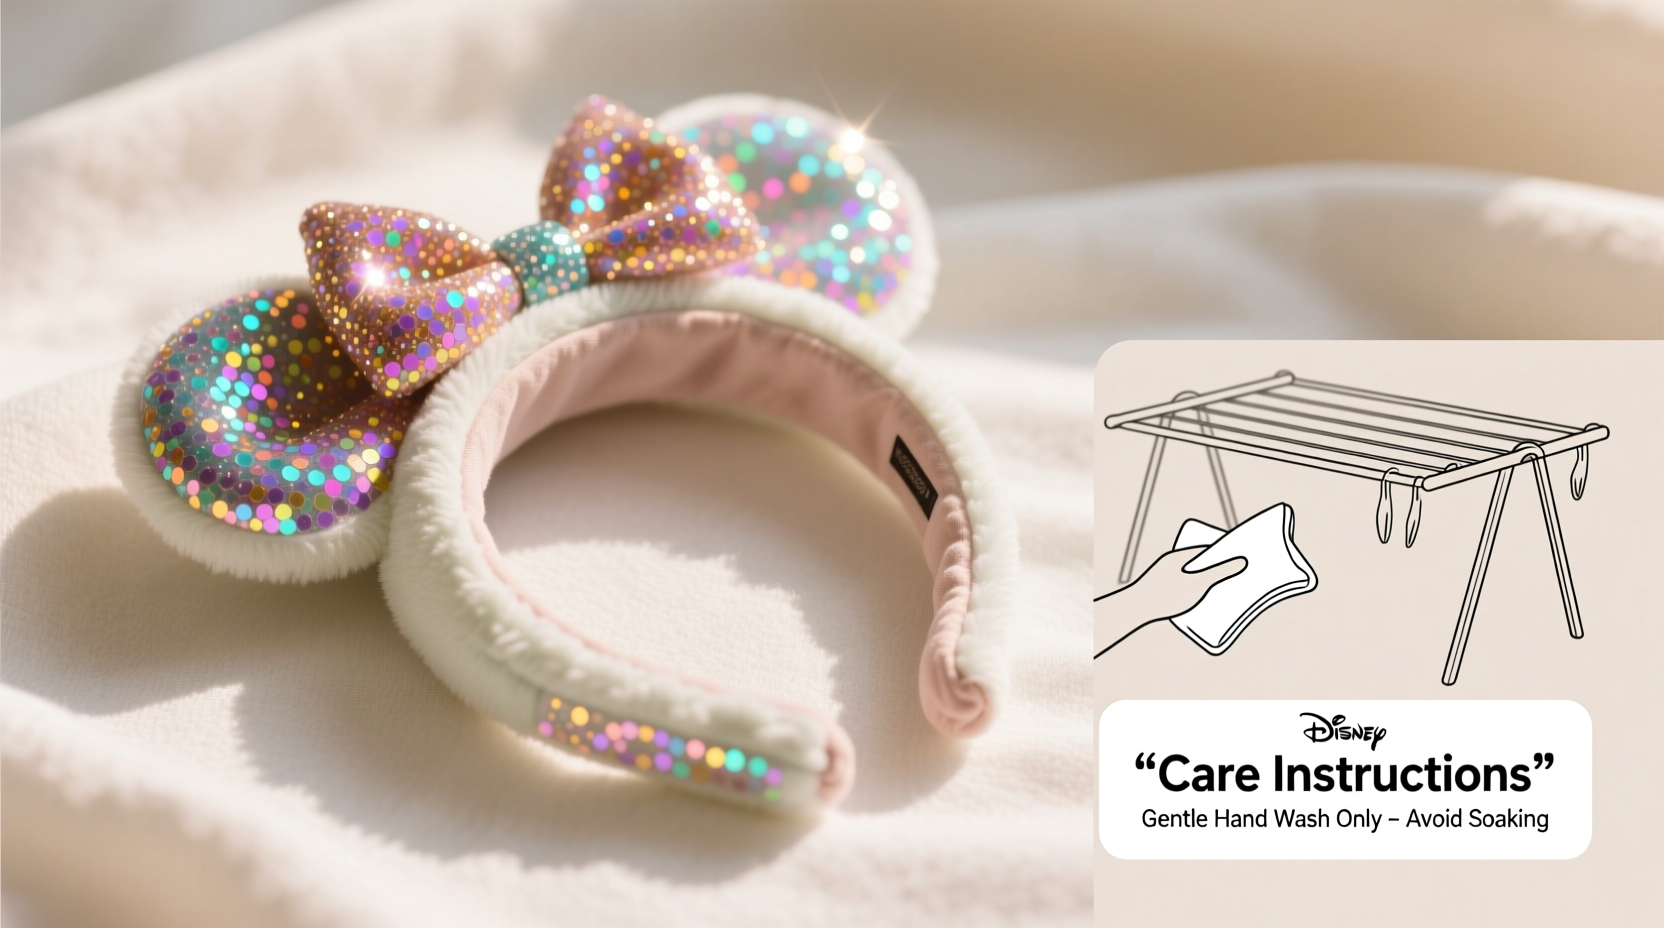
Before any cleaning begins, it's essential to identify what your headband is made of. Most glitter Disney plush headbands consist of three primary components:
- Plush Fabric: Typically polyester or a polyester-cotton blend, often velvety or fuzzy in texture.
- Glitter Accents: Usually applied as a coating on foam shapes (like ears) or embedded in heat-transfer vinyl.
- Elastic Band: Covered in matching fabric, designed to stretch comfortably around the head.
Each material reacts differently to moisture, friction, and detergents. For example, excessive rubbing can shear off glitter layers, while soaking may cause stuffing inside plush elements to clump or mildew. Understanding this composition helps inform every cleaning decision.
“Delicate embellishments like glitter require spot treatment rather than immersion. The goal is targeted cleaning without disturbing adhesive bonds or surface finishes.” — Dr. Lena Torres, Textile Conservation Specialist
Step-by-Step Guide: Safe Hand Cleaning Process
Cleaning a glitter Disney plush headband should be a gentle, controlled process. Follow this sequence to minimize risk and maximize results:
- Inspect for Damage: Check seams, glitter areas, and elastic tension. If the glue on glitter pieces is already lifting, avoid water contact in those zones.
- Remove Surface Debris: Use a soft-bristled clothing brush or lint roller to lift dust, hair, and loose particles. Work in the direction of the fabric grain to prevent pilling.
- Spot Test: Dampen a cotton swab with a drop of mild detergent solution (1 part dish soap to 5 parts distilled water). Apply to an inconspicuous area (e.g., inside the band). Wait 10 minutes. Check for color bleed, stiffness, or glitter loss.
- Spot Clean Stained Areas: Dip a microfiber cloth corner into the solution, wring until nearly dry. Gently dab (do not rub) stained regions—especially near the forehead or behind ears. Replace cloth sections frequently to avoid spreading dirt.
- Tackle Glitter Zones Carefully: Avoid direct scrubbing. If glitter areas are soiled, lightly mist a cloth (not the headband) and press briefly, then blot dry immediately.
- Dry Thoroughly: Reshape the headband and lay it flat on a clean towel in a well-ventilated, shaded area. Do not use heat sources like hairdryers or radiators, which can melt adhesives.
- Restore Fluffiness: Once fully dry (usually after 6–8 hours), gently brush plush areas with a pet slicker brush to revive texture.
Do’s and Don’ts: Maintenance Table
| Do’s | Don’ts |
|---|---|
| Use a microfiber cloth for cleaning | Soak the headband in water |
| Clean monthly with light spot treatment | Use bleach or alcohol-based cleaners |
| Store in a breathable fabric pouch | Fold or crush plush elements during storage |
| Air out after each wear to reduce odor buildup | Machine wash or dry |
| Brush gently to maintain plush texture | Rub glitter surfaces with abrasive materials |
Real Example: Saving a Soiled Minnie Mouse Headband
A parent in Orlando recently contacted a children’s accessory repair service after her daughter’s Minnie Mouse glitter headband became visibly soiled following a birthday party at a theme park. The red glitter bow had dulled, and the ear bands showed oily residue from sunscreen and hair products. Instead of washing it, the technician used a dry microfiber cloth to absorb surface oil, followed by a 5% vinegar-water solution applied via cotton swab only to non-glitter base areas. After air drying for seven hours, the plush regained softness, and the glitter remained intact. This case underscores how precision and restraint yield better outcomes than deep cleaning.
Alternative Cleaning Methods & When to Use Them
While hand spot cleaning is ideal for routine maintenance, other methods exist for specific scenarios:
- Freezing for Odor Removal: Place the headband in a sealed bag and freeze overnight to kill odor-causing bacteria. Effective for musty smells without introducing moisture.
- Steam Refreshing: Use a garment steamer at least 6 inches from the surface to relax fibers and remove light odors. Keep steam duration under 3 seconds per area to prevent glue weakening.
- DIY Dry Cleaning Sponge: A chemical-free dry cleaning sponge (also called a magic sponge) can lift surface dirt when lightly brushed over non-glitter zones. Test first on a hidden area.
These alternatives are supplementary—not replacements—for careful hand maintenance. They work best between deeper cleanings but should never be applied directly to glittered surfaces.
Tip: Rotate between multiple headbands to reduce wear and extend time between cleanings.Frequently Asked Questions
Can I use baby wipes to clean my glitter Disney headband?
Only if they are fragrance-free and alcohol-free. Many baby wipes contain solvents that degrade glitter adhesives over time. It’s safer to use a homemade solution of mild soap and water on a cloth instead.
How often should I clean my plush headband?
Light surface cleaning every 2–3 wears is recommended. A more thorough spot clean should be done monthly if worn regularly, or quarterly for occasional use.
What should I do if glitter starts peeling?
Stop all wet cleaning immediately. To stabilize, apply a tiny amount of fabric glue (like Aleene’s) under the lifted edge using a toothpick. Press gently and let dry flat for 12 hours. Prevent future peeling by avoiding moisture and friction.
Checklist: Safe Cleaning Routine
- ☐ Inspect for loose threads or lifting glitter
- ☐ Brush away dry debris with a soft tool
- ☐ Prepare mild soap solution (1:5 ratio)
- ☐ Spot test on hidden area
- ☐ Dab stains gently—no rubbing
- ☐ Blot dry with clean towel
- ☐ Air dry flat, away from sunlight
- ☐ Fluff plush with a brush once dry
Conclusion: Preserve the Magic with Mindful Care
Your glitter Disney plush headband is more than just an accessory—it’s a token of joy, imagination, and memorable moments. With proper care, it can remain a cherished piece for years, whether passed down, displayed, or worn on special occasions. By respecting its delicate construction and following safe, proven cleaning practices, you protect both its appearance and emotional value. Small habits—like regular dusting, avoiding moisture on glitter, and storing it properly—add up to long-term preservation. Treat it with the same affection you feel when wearing it, and the sparkle will continue to shine brightly.
💬 Have a favorite cleaning hack or a rescued headband story? Share your experience in the comments to help fellow Disney fans keep their magic alive!