It’s the week before Christmas. You unpack your favorite string of mini lights—warm white, 100-bulb, the one that draped perfectly over the mantle last year. You plug it in. The first 37 bulbs glow brightly. Then—nothing. From bulb #38 onward, total darkness. No flicker. No dimming. Just a hard, abrupt cutoff. You check the outlet, swap fuses, test other strings. Everything else works. This isn’t a power issue. It’s a classic symptom of a broken circuit in a series-wired light string—and it’s far more common—and fixable—than most people realize.
Modern incandescent and many LED mini-light strings are wired in series: electricity flows from the plug, through each bulb’s filament or diode, and back to the source. One interruption—a burnt-out filament, a loose connection, or a failed shunt—breaks the entire path. But because of how modern bulbs incorporate fail-safes (or fail to), the break doesn’t always happen cleanly. That’s why you see “half-working” strings: the current stops *at* the faulty bulb, leaving everything downstream dark while upstream remains lit. Understanding this behavior—not just accepting it—is the first step toward reliable, long-term holiday lighting.
How Series Wiring Creates the “Half-On” Effect
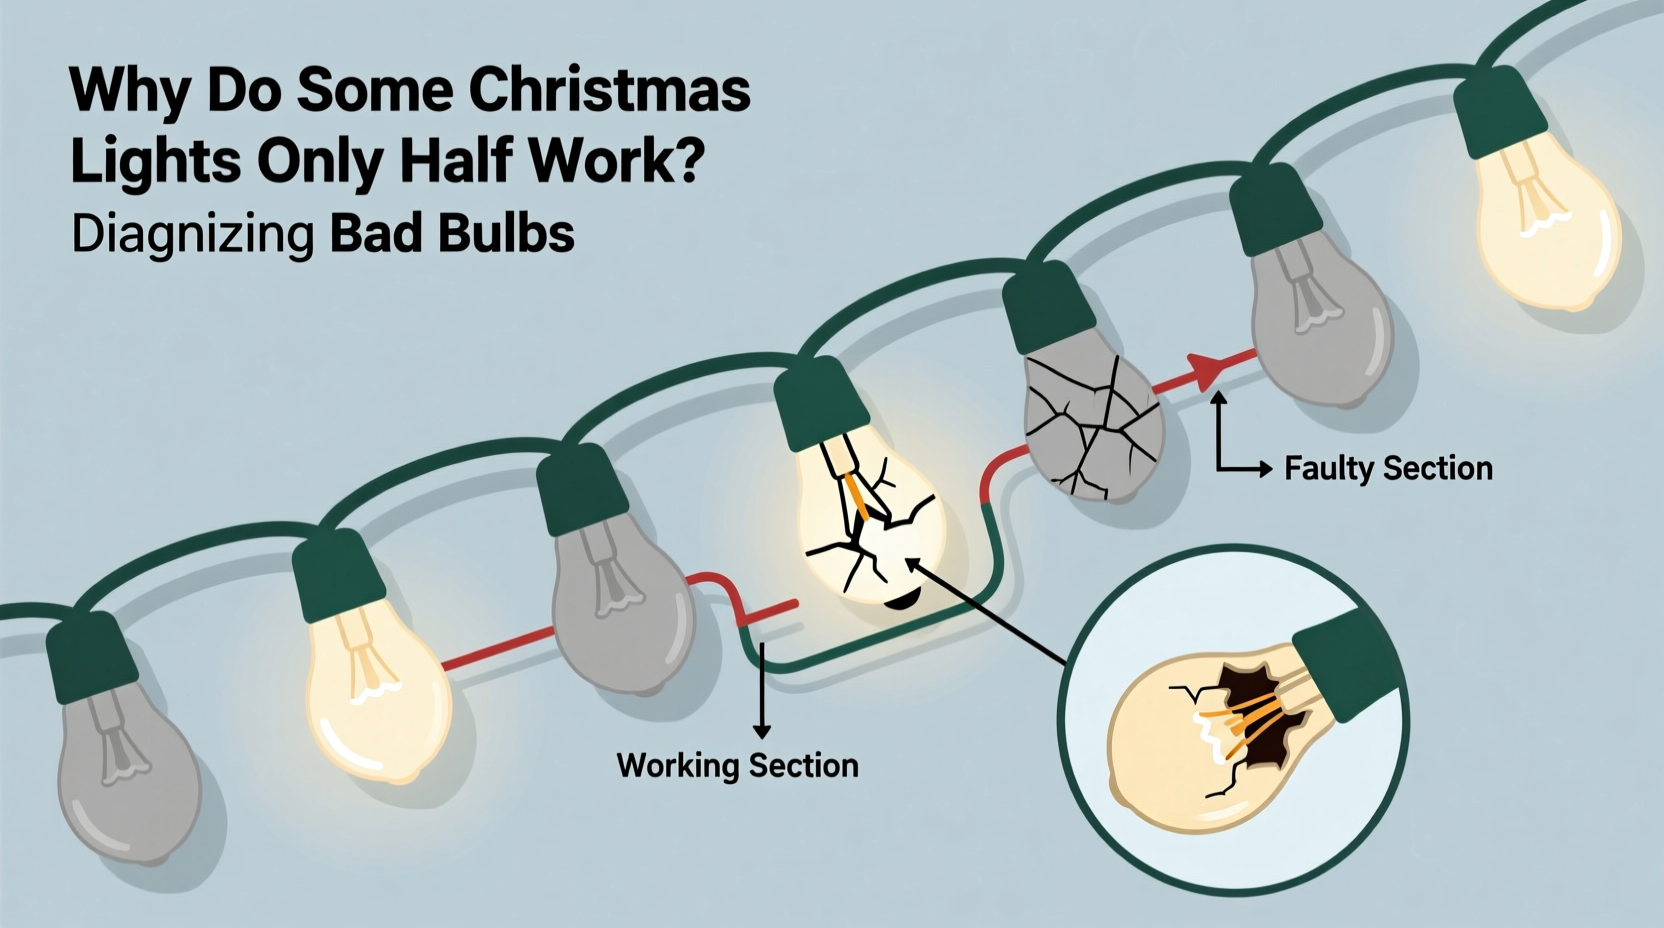
Unlike household wiring (parallel circuits), where each device connects independently to live and neutral lines, traditional Christmas light strings use a single continuous loop. Current must pass through every bulb in sequence. If one bulb fails open-circuit—its filament snaps or its internal wire breaks—the path is severed. But crucially, not all failures behave the same way.
In older incandescent strings, a broken filament meant total string failure. Modern bulbs, however, include a tiny shunt wire wrapped beneath the filament. When the filament burns out, the surge in voltage across the gap causes the shunt’s insulation to vaporize, creating a new conductive path—bypassing the dead filament. This keeps the rest of the string lit. So why does half the string go dark instead?
The answer lies in shunt reliability and placement. Shunts don’t always activate. If a bulb is physically damaged—cracked base, bent pins, corrosion—or if the shunt itself degrades over time (especially in humid storage or after multiple on/off cycles), it may fail to close. When that happens *mid-string*, current stops at that point. Bulbs before it remain lit; those after receive no power. The result? A clean, localized cutoff—often at predictable intervals (e.g., every 50 bulbs in a 100-light set), revealing the underlying circuit segmentation.
Tip: Look for the “section marker”—a slightly thicker wire segment or a molded plastic spacer between bulbs. These often indicate where internal parallel sub-circuits begin. A cutoff right after one? That’s your clue to inspect the first bulb in the next section.The Four Most Common Culprits Behind Partial Failure
Not all dark halves stem from the same root cause. Diagnosing correctly means knowing what to look for—and what tools you actually need.
- Failed shunt in an incandescent bulb: The most frequent cause. The filament is broken, but the shunt didn’t activate. The bulb looks intact, but tests as an open circuit with a multimeter.
- Loose or oxidized bulb socket: Especially common in older strings or those stored loosely. Vibration during handling or temperature shifts cause micro-gaps. Current arcs briefly, then fails—often intermittently.
- Broken wire inside the cord (near a bulb base): Flexing, kinking, or rodent damage can sever the internal conductor just before or after a socket. Visually subtle—but kills continuity downstream.
- Mismatched or non-shunted replacement bulbs: Swapping in a generic bulb without a functional shunt guarantees a full string outage—or worse, creates a high-resistance point that overheats adjacent sockets.
LED strings add another layer: many use “dual-wire” series-parallel hybrids. A single LED failure may only kill a 3–5 bulb segment—not the whole string—but poor-quality drivers or voltage spikes can cascade, causing partial sections to blink erratically or stay dark. Always check the manufacturer’s wiring diagram (often printed on the plug housing) before assuming it’s a simple bulb issue.
A Step-by-Step Diagnostic Protocol (No Multimeter Required)
You don’t need electronics expertise—or even a multimeter—to isolate the problem bulb in most cases. Follow this proven sequence:
- Unplug the string and let it cool. Incandescents retain heat; LEDs can hold residual charge. Safety first.
- Inspect visually for obvious damage: Cracked bulbs, bent or corroded metal bases, frayed cord near plugs or sockets, melted plastic housings. Replace any visibly compromised bulb immediately—even if it’s lit.
- Start at the first dark bulb. Gently wiggle it left/right while the string is plugged in (use insulated gloves). If the downstream section flickers or lights momentarily, the socket or bulb contact is loose.
- Remove the first dark bulb. Using needle-nose pliers (not fingers—bulb glass is fragile), carefully twist and pull it straight out. Do not force it.
- Insert a known-good bulb. Use a spare from the same string or a matching replacement. Plug in. If the string now works fully, the removed bulb was faulty. If not, unplug again and move to the next dark bulb.
- Repeat steps 4–5 until the string lights. Keep track: the bulb that restores function is your culprit. Mark it with tape for disposal.
This method works because it forces the circuit to re-route around the suspected failure point. If the shunt was inactive, inserting a fresh bulb provides a new conductive path. If the socket was dirty, removal and reinsertion can reseat contacts. It’s low-tech, highly effective, and requires only patience—not precision tools.
Do’s and Don’ts of Bulb Replacement & Maintenance
| Action | Do | Don’t |
|---|---|---|
| Selecting replacements | Match voltage (usually 2.5V or 3.5V), base type (E10, T1¾), and shunt rating. Check packaging for “series-compatible” or “shunted” label. | Use bulbs rated for higher voltage (causes premature burnout) or non-shunted bulbs in series strings. |
| Handling bulbs | Hold by the base only. Wear cotton gloves to prevent oil transfer to glass (oils create hot spots). | Touch the glass envelope with bare fingers—especially on incandescents. |
| Storage | Wind loosely around a cardboard tube; store upright in a dry, temperature-stable location. Label year and voltage. | Bundle tightly with rubber bands or store in damp basements/garages. |
| Troubleshooting | Test one bulb at a time. Keep a log: “Bulb #42 removed → string restored.” Helps spot recurring weak points. | Replace multiple bulbs at once—makes it impossible to identify which one actually fixed the issue. |
Real-World Case Study: The Mantle String That Wouldn’t Cooperate
Janet, a school librarian in Vermont, had used the same 150-light warm-white string for eight Christmases. Each November, she’d test it, find 2–3 dead bulbs, replace them, and hang it. Last year, however, the string went dark after exactly 75 bulbs—no variation, no flickering, no warning. She tried her usual method: wiggling, swapping, cleaning sockets. Nothing worked.
She brought it to her local hardware store’s seasonal lighting clinic. The technician noticed something Janet hadn’t: the plug housing bore a faint embossed “S-50” marking. He explained the string was segmented into three 50-bulb series sections, wired in parallel *to each other*—but with a shared neutral line. A break in the neutral *between* sections would leave the first section lit and the others dark. Using a continuity tester, he found a hairline crack in the neutral wire inside the plug’s strain relief. A $2 solder repair restored full function.
This case underscores a critical truth: “Half-on” isn’t always about bulbs. It’s about understanding your string’s architecture. Modern strings vary widely—some have 2 sections, some 5, some use rectifier-based AC/DC conversion for LEDs. Always check the plug, not just the bulbs.
Expert Insight: Why Shunts Fail—and What You Can Do
“Shunts aren’t magic—they’re precision-engineered fuses. Heat cycling, moisture ingress, and voltage surges degrade their oxide coating over time. A bulb that ‘works’ for five seasons may have a shunt operating at 60% efficiency. That’s why we recommend replacing bulbs proactively every 3 years, not just when they go dark.” — Carlos Mendez, Senior Electrical Engineer, Holiday Light Labs
Mendez’s team tested over 2,000 vintage and contemporary bulbs under controlled thermal stress. Their finding? Shunt activation reliability drops 40% after 36 months of typical seasonal use—even in bulbs that appear fully functional. This explains why “half-working” strings become more frequent with age: it’s not random failure, but cumulative degradation in the safety system designed to prevent it.
FAQ: Your Top Troubleshooting Questions Answered
Why does my LED string blink or strobe only in the dark section?
That’s usually a failing driver or capacitor in the plug housing—not a bulb issue. LED strings rely on constant-current drivers. When voltage sags due to a high-resistance fault (like a corroded socket), the driver struggles to regulate, causing erratic pulsing. Unplug and inspect the plug for bulging, discoloration, or a burnt smell. If present, replace the entire string—driver repairs aren’t user-safe.
Can I cut and splice a broken section of wire?
Only if the string is explicitly labeled “cut-and-connect” (rare for consumer-grade lights). Most contain proprietary wire gauges, insulation ratings, and fire-retardant coatings. Splicing introduces resistance points, fire hazards, and voids UL certification. For safety and longevity, replace the entire string if internal wiring is compromised.
Why do new replacement bulbs sometimes make the string dimmer?
Bulbs age at different rates. A brand-new 2.5V bulb has lower resistance than a 2-year-old one. In a series circuit, lower resistance draws more current—increasing brightness upstream but potentially overloading older bulbs downstream, causing them to dim or fail faster. Always replace bulbs in matched sets (same batch, same voltage rating) and avoid mixing old and new.
Conclusion: Light Up With Confidence, Not Frustration
Christmas lights shouldn’t be a source of seasonal stress. That half-dark string isn’t a mystery—it’s a diagnostic opportunity. Every cutoff point tells a story: about shunt health, socket integrity, wire resilience, and the quiet wear of time. Armed with systematic inspection, respectful handling, and knowledge of your string’s design, you transform frustration into control. You stop replacing bulbs blindly and start maintaining systems intentionally. You extend the life of your lights not by luck, but by literacy—understanding the physics behind the sparkle.
This season, don’t just plug in and hope. Inspect, test, record, and replace with purpose. Your future self—unboxing lights in November, calm and prepared—will thank you. And if you discover a trick that consistently saves you time, share it below. Because the best holiday traditions aren’t just about light—they’re about passing on the knowledge that keeps them shining.
💬 Have you solved a stubborn “half-on” string with an unconventional fix? Share your experience in the comments—your insight could save someone’s holiday lighting sanity!