Wrapping a column or pillar with Christmas lights seems simple—until you step back and see the gaps, the sagging loops, the lopsided spirals, or the glaring “light desert” near the base. Amateur wraps rarely survive the first gust of wind or the second week of December. Professionals don’t rely on guesswork or sheer volume of lights; they use repeatable geometry, intentional tension control, and structural awareness. This isn’t about hiding flaws with more bulbs—it’s about precision that reads as effortless elegance. Whether you’re dressing a porch column, a stairway baluster, a commercial lobby pillar, or a freestanding gazebo post, achieving visual continuity requires understanding how light, form, and physics interact.
Why even wrapping matters—and what goes wrong
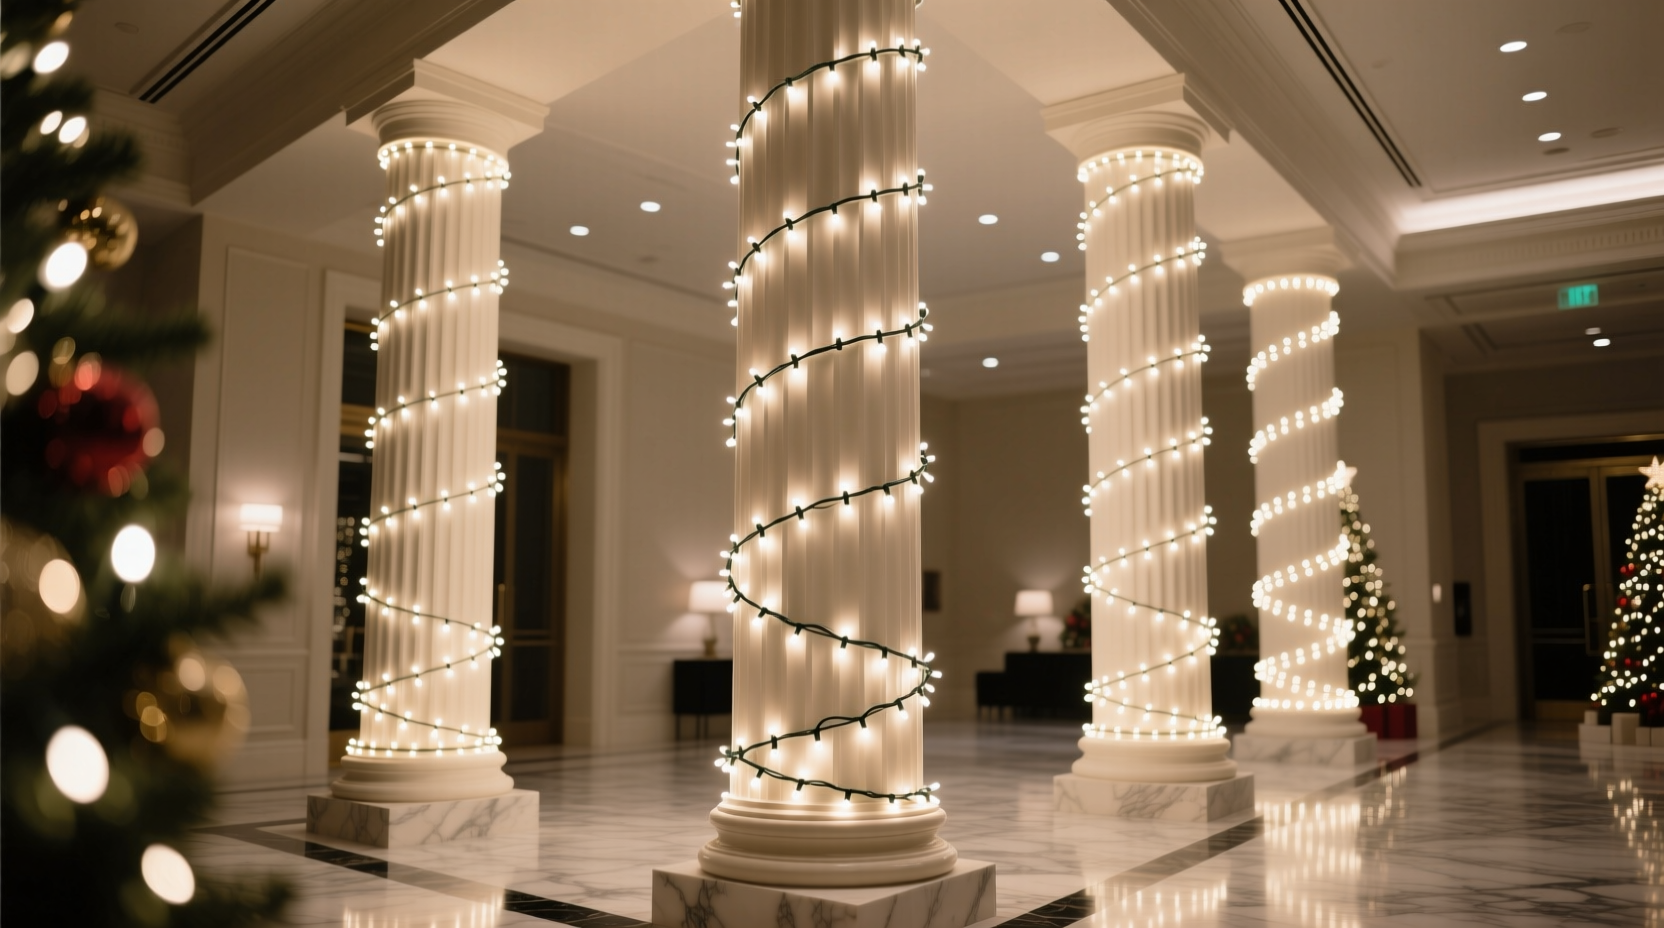
Uneven wrapping doesn’t just look sloppy—it undermines durability and safety. Gaps expose wiring, create hot spots where wires rub against rough surfaces, and invite moisture ingress in outdoor settings. Over-tightened sections stress bulb sockets and strain wire insulation, increasing failure risk. Loosely coiled segments sway, tangle, or detach under wind load. Worse, inconsistent spacing creates optical distortion: dense clusters appear brighter and “busier,” while sparse zones recede visually, breaking the column’s vertical rhythm.
Most DIY attempts fail at three critical points: starting alignment, spiral consistency, and termination integrity. Without anchoring the first loop at the exact same height and angle around the circumference—and maintaining that angle across every revolution—the entire spiral drifts. A 2° deviation per loop compounds to over 36° after 18 turns. That’s enough to make the top coil visibly offset from the bottom, destroying symmetry.
Tip: Before unwrapping a single strand, measure your column’s height and circumference—and calculate your ideal vertical pitch using the formula: (Height ÷ Number of Desired Loops) = Loop Spacing. Round to the nearest ½ inch for practicality.The pro’s 7-step wrapping sequence
This method is used by commercial lighting installers for high-visibility retail and municipal displays. It eliminates guesswork, ensures uniform density, and takes under 12 minutes per standard 8-ft column—even on the first attempt.
- Measure and mark reference points: Use a tape measure and non-permanent marker to place horizontal tick marks every 6 inches up the column’s height. Then, at the base, mark a “start point” on the front-facing side (e.g., 12 o’clock position).
- Determine loop count and spacing: For an 8-ft (96-inch) column, aim for 16–20 full loops. Divide height by target loops (e.g., 96 ÷ 18 = 5.33 inches). Round to 5¼ inches. Mark this vertical interval on your tape measure with colored tape for quick reference.
- Anchor the starting end securely: Use a heavy-duty outdoor-rated zip tie—not tape—to fasten the plug end at the base mark. Leave 6 inches of slack before the first loop. Ensure the cord exits upward, not sideways.
- Establish the first full loop at precise height and angle: At the first 5¼-inch mark above the base, wrap the strand once around the column *at exactly the same rotational position* (e.g., always aligning the wire’s flat side toward the front). Pull gently but firmly—enough to remove slack without stretching the wire. Secure temporarily with a removable clothespin or binder clip.
- Maintain consistent pitch and tension: Move up to the next 5¼-inch mark. Rotate the strand *exactly one full turn* (360°) from the previous loop’s orientation—not more, not less. Use your thumb to hold the wire against the column while rotating your wrist smoothly. Repeat, checking alignment against your tick marks every 3–4 loops.
- Manage transitions at top and bottom: At the final loop, stop 1 inch below the top edge. Tuck the end behind the last loop and secure with a zip tie. Do not stretch to reach the very top—that distorts spacing. For the base, route the cord downward along the backside and conceal it in trim or mulch.
- Final tension check and refinement: Starting from the top, lightly run your palm down each loop. If any feels loose, re-tension *only that loop*—don’t pull the entire strand. Trim excess zip tie ends flush with diagonal cutters.
Material selection: What works—and what sabotages evenness
Not all Christmas lights are created equal for vertical wrapping. Wire gauge, bulb spacing, flexibility, and jacket material directly impact your ability to maintain consistent loops. Here’s how key specs translate to real-world performance:
| Feature | Ideal for Even Wrapping | Avoid for Columns/Pillars |
|---|---|---|
| Wire Type | Stranded copper with PVC or rubberized jacket (flexible, kink-resistant) | Solid-core wire (stiff, holds memory bends) |
| Bulb Spacing | 4–6 inches (allows clean looping without crowding) | 2-inch mini lights (too dense—bulbs bump into each other on curves) |
| Cord Gauge | 22 AWG or thicker (holds shape under mild tension) | 24+ AWG (too thin—sags between loops) |
| Mounting Aid | Integrated clips or adhesive-backed channel tape (for hybrid support) | Heavy-duty plastic clips (add bulk, disrupt smooth spiral) |
| Outdoor Rating | UL 588 wet-location rated with sealed connectors | Indoor-only or non-rated strands (moisture causes early failure) |
Pro installers consistently choose C7 or C9 bulbs on 22 AWG wire with 6-inch spacing for architectural pillars. The larger bulb mass provides subtle visual weight that anchors the spiral, while the spacing allows natural wire flex without forcing sharp bends.
Real-world case study: Reviving a historic porch column
In December 2023, landscape architect Lena Ruiz was hired to refresh holiday lighting for a 1920s Craftsman home in Portland, Oregon. The client had tried wrapping the tapered, 12-ft square-columned porch for three years—each time resulting in lopsided, drooping strands that required daily readjustment. Previous attempts used 24 AWG mini lights with 3-inch spacing and double-sided tape.
Ruiz assessed the column: 10 inches wide at base, tapering to 8 inches at top, with textured stucco surface. She replaced tape with UV-stabilized nylon zip ties and switched to 22 AWG C7 LED lights with 6-inch spacing. Using the 7-step method, she calculated 19 loops (96″ ÷ 19 ≈ 5.05″), adjusted spacing to 5″ for simplicity, and marked the column with chalk (easier to wipe off stucco than marker). Crucially, she wrapped *upward* from base to top—but rotated the strand *clockwise* on the left face and *counter-clockwise* on the right face to compensate for the taper, ensuring consistent visual density. The result held through 42 mph winds and three weeks of rain—no retensioning required. As Ruiz noted in her project notes: “Evenness isn’t about fighting the column’s shape. It’s about reading its geometry and adapting the spiral to it.”
“Amateur wrapping treats the column as a passive object. Professional wrapping treats it as a dynamic partner—its diameter, texture, and taper inform every loop. That’s where true evenness begins.” — Marcus Bell, Lead Installer, Lumina Architectural Lighting (12+ years commercial holiday installation)
Do’s and Don’ts: Critical habits that separate pros from amateurs
- Do test tension on a 3-ft section before committing to the full column—adjust spacing if loops feel too tight or too loose.
- Do use a cordless drill with a low-torque setting and soft-jaw clamp to rotate the strand smoothly when wrapping tall or hard-to-reach pillars.
- Do inspect each strand for damaged sockets or frayed wire before installation—replacing one faulty bulb mid-wrap breaks rhythm and forces re-measurement.
- Don’t wrap over existing paint cracks or peeling surfaces—moisture will wick underneath and accelerate deterioration.
- Don’t use staples, nails, or screw-in hooks on wood or masonry—they damage structure and create electrical hazards.
- Don’t assume “more lights = better effect.” Over-wrapping obscures architectural detail and increases heat buildup.
FAQ: Solving common wrapping challenges
How do I wrap a tapered column without gaps opening up at the top?
Tapered columns require active compensation. Calculate two loop counts: one for the base circumference and one for the top. For example, if base is 42 inches and top is 36 inches, use 18 loops at the base (42″ ÷ 18 = 2.33″ spacing) and 18 loops at the top (36″ ÷ 18 = 2″ spacing). Gradually decrease spacing by 0.02 inches per loop as you ascend. Mark these micro-adjustments on your tape measure with fine pencil lines.
Can I wrap a metal column without damaging the finish?
Absolutely—but avoid abrasive contact. Use soft-grip zip ties (nylon with rubber coating) and tighten only until snug, not until the wire indents the metal. For polished stainless or powder-coated surfaces, add a ⅛-inch strip of felt tape where the zip tie contacts the column. Never use duct tape or vinyl wrap—it leaves residue and traps moisture.
What’s the fastest way to unwrap lights without tangling next January?
Wrap *backwards*: Starting at the top, carefully unwind each loop while holding the previous one in place with your thumb. Coil the strand into 12-inch-diameter circles—not figure-eights—and secure each coil with a twist-tie labeled “Top,” “Mid,” “Base.” Store vertically in ventilated bins—not cardboard boxes—to prevent condensation-related corrosion.
Conclusion: Your column deserves intentionality
A perfectly wrapped column does more than signal the season—it communicates care, craftsmanship, and respect for architecture. It transforms a structural element into a luminous statement, drawing the eye upward with quiet confidence. That level of polish isn’t born from extra lights or longer hours—it emerges from deliberate measurement, disciplined repetition, and understanding how materials behave under tension. You don’t need specialty tools or years of experience to achieve it. You need the right sequence, the right specs, and the willingness to treat each loop as a small act of precision.
Start with one column this year. Measure twice. Mark deliberately. Wrap with purpose—not speed. Notice how the light falls, how the rhythm holds, how the vertical line remains unbroken. That’s the pro finish—not perfection, but intention made visible. When neighbors pause on the sidewalk, it won’t be the brightness they remember. It’ll be the balance.
💬 Share your breakthrough moment: Did a single tip transform your wrapping? Tag us with #ProWrapSuccess—we feature real reader results every December!