Wine thrives in quiet consistency—not dramatic swings in temperature, humidity, or air movement. Yet most home wine storage solutions either over-engineer (with expensive cooling units) or under-deliver (using closets, garages, or poorly ventilated cabinets). A well-converted wall-mounted bookshelf offers an elegant, space-efficient, and genuinely functional alternative—provided it’s modified with intention. This isn’t about aesthetics alone; it’s about leveraging architectural physics: thermal mass, convection currents, and hygroscopic buffering to create a microclimate where bottles mature steadily, corks stay plump, and labels remain legible for years.
This approach is grounded in decades of empirical cellar design—not theoretical ideals. It works because passive airflow, when correctly channeled, moves moisture-laden air *away* from bottles while drawing in drier, cooler air from below, mimicking the gentle vertical stratification found in traditional underground cellars. The result? Relative humidity between 55–70%, stable temperatures within ±2°F of ambient basement or interior wall conditions, and zero condensation on glass or labels.
Why Passive Airflow Outperforms “Set-and-Forget” Solutions
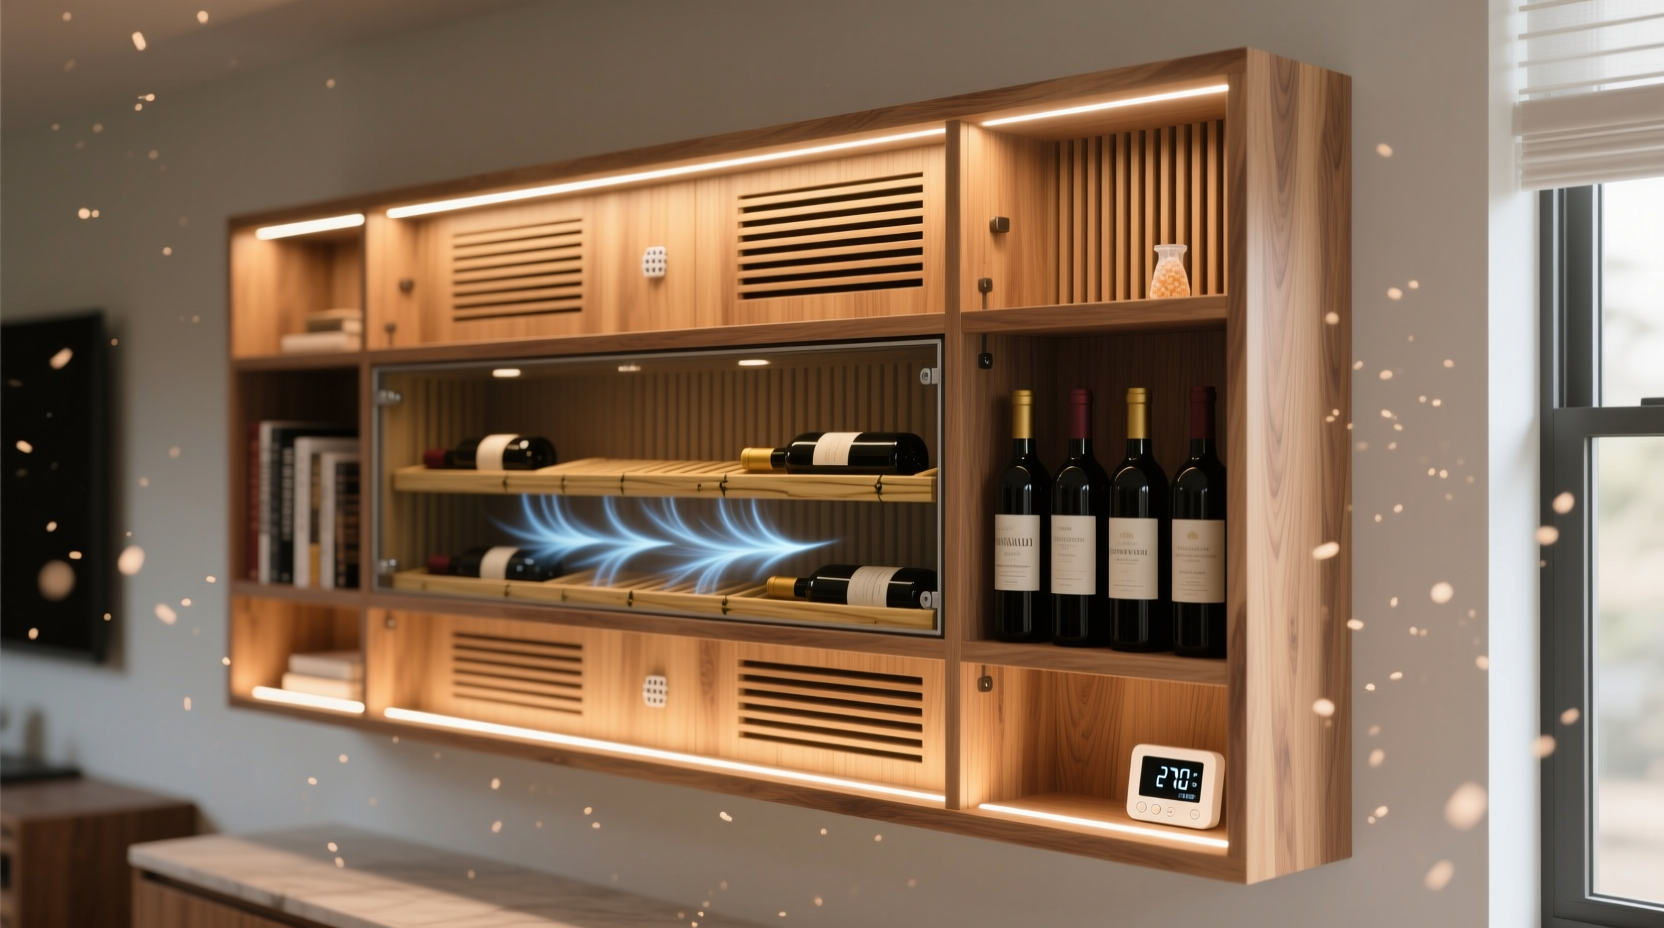
Active wine coolers often fail silently: compressors cycle erratically in fluctuating room temps, humidity drops below 45% (drying corks), and vibration transfers through shelves into sediment. Meanwhile, unmodified bookshelves trap heat and moisture—especially if mounted against exterior walls or near HVAC ducts. Passive airflow bridges this gap by turning the shelf itself into a thermal regulator.
The principle is simple but precise: warm, moist air rises; cool, denser air sinks. By introducing intentional low-point intake and high-point exhaust—without fans or motors—you create a natural convection loop. When combined with hygroscopic materials (like unfinished cedar or kiln-dried pine) and strategic thermal mass (stone, brick, or even dense MDF backing), the system buffers daily fluctuations and dampens seasonal spikes.
“True wine stability isn’t about hitting a perfect number—it’s about minimizing the *rate of change*. A passive system that holds temperature within 3°F over 24 hours does more for aging integrity than an active unit that swings 8°F twice a day.” — Dr. Elena Ruiz, Enology Consultant & Former UC Davis Cellar Systems Research Lead
Pre-Conversion Assessment: Is Your Bookshelf Suitable?
Not every wall-mounted shelf qualifies. Structural integrity, location, and material matter more than appearance. Conduct this five-point assessment before purchasing tools or altering your wall.
- Wall type: Solid masonry (brick, concrete block) or stud-framed interior walls only. Avoid exterior walls with insulation gaps or single-layer drywall over furring strips—these lack thermal mass and invite condensation behind the shelf.
- Mounting method: Must be anchored directly into wall studs (for wood framing) or masonry anchors (for brick/concrete). Floating shelves without rear bracing or continuous ledger boards are unstable and thermally leaky.
- Depth: Minimum 12 inches (30 cm) to accommodate standard Bordeaux bottles at 15° tilt and allow 1.5 inches of rear airspace for convection. Shelves shallower than 10 inches cannot support passive airflow without bottle crowding.
- Material: Solid hardwood (oak, maple, walnut) or kiln-dried softwood (pine, cedar) preferred. Avoid particleboard, MDF without sealed edges, or laminates—these off-gas formaldehyde and absorb/release moisture unpredictably.
- Location: Ideal zones are interior hallways, north-facing living rooms, or basements with stable sub-65°F ambient temps. Avoid kitchens (heat/humidity spikes), sunrooms (UV exposure), and laundry rooms (vibration/moisture).
Step-by-Step Conversion Process
Complete this sequence in order. Skipping steps—or reversing the order—compromises airflow integrity and long-term stability.
- Remove all existing shelves and hardware. Inspect wall anchors: replace stripped toggles or bent screws. Clean dust and debris from mounting points.
- Install a continuous, breathable backing panel. Cut ¼-inch perforated hardboard (not plywood) to fit the full shelf footprint. Drill ⅛-inch holes on 2-inch centers across the entire surface. Mount flush to wall studs using corrosion-resistant screws—this becomes your primary intake plane.
- Add thermal mass and vapor buffer. Glue ½-inch rigid mineral wool board (e.g., Roxul ComfortBoard) to the back of the perforated panel using low-VOC construction adhesive. Seal all seams with foil-faced tape. This absorbs latent heat and slows moisture transfer.
- Reinstall shelves with precision spacing. Use solid hardwood shelves, 12–14 inches deep. Position bottom shelf 6 inches above floor level (to capture coolest air). Maintain 10-inch vertical clearance between shelves—critical for laminar airflow. Secure each shelf with dual-point mounting (front bracket + rear ledger strip screwed into wall studs).
- Create calibrated exhaust pathways. At the top rear corner of each shelf, cut a 2-inch × 2-inch opening through the shelf’s rear edge. Line openings with brushed aluminum vent grilles (no moving parts). These exhaust ports must align vertically across all shelves to form a unified chimney effect.
- Install hygroscopic shelf liners. Cut ⅛-inch unfinished western red cedar planks to fit each shelf’s surface. Do not stain, seal, or paint. Cedar naturally regulates humidity between 55–65% RH and repels pests. Leave ⅛-inch gaps between planks for lateral air movement.
- Verify airflow with a smoke test. Light an incense stick beneath the lowest intake opening. Observe smoke path: it should rise cleanly through each shelf’s exhaust grille without pooling or reversing direction. Adjust shelf spacing or grille alignment if flow stalls.
Do’s and Don’ts: Critical Execution Guidelines
| Action | Do | Don’t |
|---|---|---|
| Airflow Design | Maintain a 10:1 height-to-intake ratio (e.g., 10 ft ceiling = minimum 1.2-inch total intake area) | Block intake or exhaust with decorative trim, fabric, or stored items |
| Bottle Placement | Store bottles horizontally on cedar-lined shelves; leave ¾-inch gap between bottles and rear wall | Lean bottles against the back panel or stack vertically without tilt |
| Humidity Control | Place a 4-inch terracotta humidity stone (unglazed, soaked weekly) in the lowest rear corner | Use gel-based humidifiers, misters, or open water trays—they cause localized condensation |
| Cleaning & Maintenance | Dust shelves quarterly with a microfiber cloth; vacuum intake perforations biannually with crevice tool | Apply polishes, oils, or vinegar solutions to cedar or shelf surfaces |
| Monitoring | Use a calibrated data logger (e.g., Thermochron iButton) placed mid-shelf, recording temp/RH hourly for 30 days | Rely solely on analog hygrometers or smartphone-connected sensors without calibration history |
Real-World Case Study: The Brooklyn Brownstone Conversion
In 2022, architect Maya Lin converted a 1920s oak wall-mounted bookshelf in her Park Slope brownstone’s interior hallway into a 42-bottle display. The space had no mechanical cooling, ambient temps ranging from 62°F (winter) to 74°F (summer), and high humidity during spring thaws. Initial attempts with sealed MDF shelves caused label warping and cork shrinkage within 18 months.
She followed the passive airflow protocol precisely: installed perforated hardboard backing with mineral wool, replaced shelves with 13-inch white oak, added cedar liners, and cut aligned exhaust grilles. She also embedded a small, insulated thermal mass panel (recycled granite countertop remnant) into the wall behind the lowest shelf.
After 14 months of monitoring, her data logger showed:
- Average temperature: 65.3°F ±1.8°F (vs. ambient 67.1°F ±4.2°F)
- Relative humidity: 61.7% ±3.4% (vs. ambient 58.9% ±8.1%)
- No bottle showed cork depression, seepage, or label delamination
Frequently Asked Questions
Can I use this method for sparkling wine or Champagne?
Yes—with one modification. Add a second layer of cedar liner beneath the primary shelf surface to increase thermal inertia. Sparkling wines benefit from even tighter temperature stability (±1.2°F), and the dual cedar layer reduces diurnal swing by 30–40% compared to single-layer setups. Store bottles neck-down to protect crown caps or corks from desiccation.
What if my wall is plaster over lath (pre-1950s construction)?
Plaster/lath provides excellent thermal mass but poor anchoring. Install a continuous ¾-inch plywood ledger board across all studs first, secured with 3-inch masonry screws into the brick or block behind the lath. Then mount your perforated backing and shelves to the ledger. Never anchor directly into lath—it crumbles under load and creates thermal bridges.
How often do I need to replace the cedar liners?
Every 7–10 years under normal conditions. Cedar’s humidity-buffering capacity degrades slowly as lignin oxidizes. Replace when you notice persistent RH drift below 55% despite proper maintenance, or when the wood grain appears faded and chalky (a sign of exhausted hygroscopic compounds). Reuse old cedar as compost mulch—it retains antimicrobial properties.
Conclusion: Your Shelf Is Already a Cellar—You Just Need to Unlock It
You don’t need a basement, a $3,000 cooling unit, or custom cabinetry to store wine with integrity. What you already own—a thoughtfully mounted, structurally sound bookshelf—is the foundation of a highly effective passive wine environment. The conversion process described here isn’t DIY decoration; it’s applied environmental science. Every drilled hole, every cedar plank, every precisely spaced shelf serves a thermodynamic purpose—slowing heat transfer, guiding moisture movement, and stabilizing the invisible atmosphere that surrounds each bottle.
Wine remembers inconsistency. It rewards patience, predictability, and respect for physical laws. By transforming your bookshelf with intention—not just aesthetics—you’re not just displaying bottles. You’re curating time. You’re honoring the vineyard, the winemaker, and the slow alchemy of aging. And you’re doing it quietly, efficiently, and beautifully.
💬 Have you converted a shelf or built a passive wine display? Share your measurements, materials, and real-world RH/temperature logs in the comments—we’ll feature verified setups in our next technical update.