In an era where sustainability meets design, reimagining everyday materials can lead to surprisingly elegant solutions. Cardboard, often dismissed as temporary packaging, holds untapped potential when treated with care and creativity. With a few simple techniques, it's possible to transform corrugated cardboard into a sturdy, attractive laundry basket that blends functionality with modern style. This guide walks you through the entire process—from sourcing materials to finishing touches—so you can craft a custom storage piece that’s both eco-conscious and long-lasting.
Why Choose Cardboard for Home Storage?
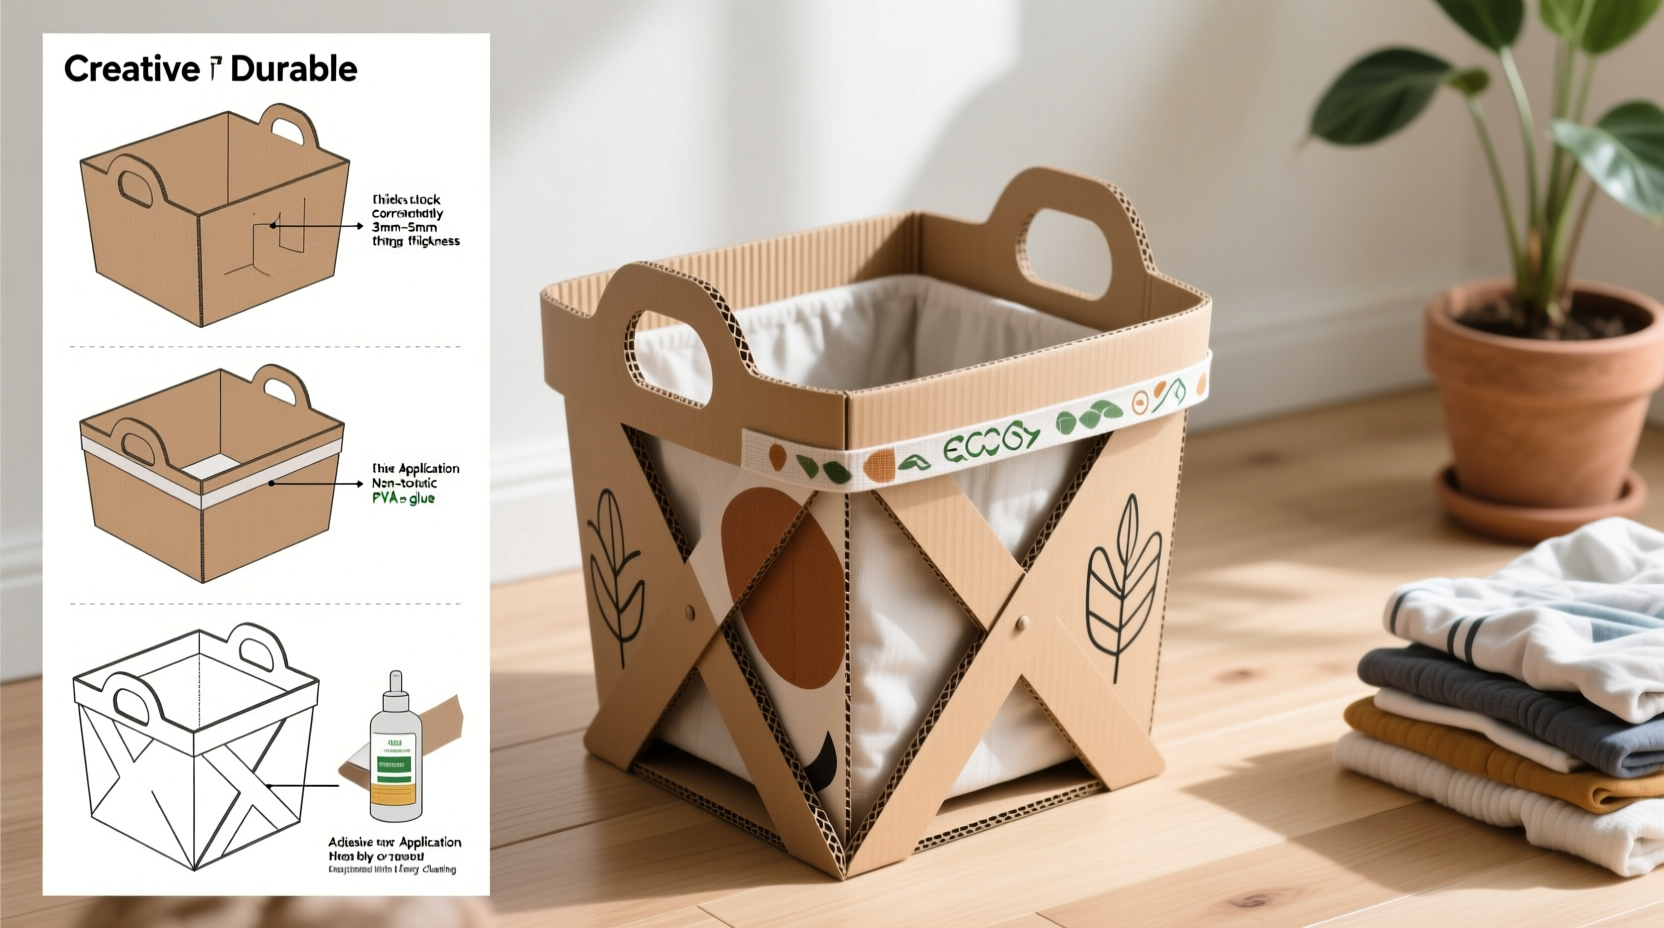
Cardboard is more than just disposable packaging. When reinforced and sealed properly, it becomes a lightweight yet resilient material ideal for indoor storage projects. Its cellular structure provides natural cushioning and insulation, while its flat form makes it easy to cut, fold, and assemble. By using recycled or repurposed boxes, you reduce waste and avoid the environmental cost of plastic bins or mass-produced wicker baskets.
Interior designers and DIY enthusiasts alike are embracing cardboard furniture for its low carbon footprint and adaptability. As designer Mara Lopez notes:
“Sustainable design isn’t about sacrificing beauty—it’s about redefining what’s possible with humble materials.” — Mara Lopez, Sustainable Interior Designer
A well-built cardboard laundry basket can last several years indoors if protected from moisture and heavy wear. With fabric wrapping, paint finishes, or decorative paper lamination, it easily matches any room aesthetic—from minimalist bedrooms to playful kids’ spaces.
Materials and Tools You’ll Need
Before starting construction, gather all necessary supplies. Most items are household staples or easily sourced from craft stores.
| Material/Tool | Purpose | Alternative Options |
|---|---|---|
| Corrugated cardboard (double-wall preferred) | Main structural component | Furniture-grade cardboard panels |
| White glue or PVA adhesive | ||
| Bonding layers securely | Wood glue (slower drying but stronger) | |
| Utility knife or box cutter | Cutting precise shapes | Rotary cutter with metal ruler |
| Paintbrush or foam brush | Applying sealant and glue | Sponge applicator |
| Mod Podge or water-based varnish | Surface sealing and durability | Clear acrylic sealer spray |
| Decorative paper, fabric, or contact paper | Styling the exterior | Wallpaper samples, gift wrap |
| Heavy books or clamps | Holding glued pieces in place | Bricks wrapped in cloth |
Step-by-Step Construction Guide
Follow this detailed sequence to build a stable, attractive laundry basket with clean edges and reinforced corners.
- Design Your Basket Dimensions
Decide on size based on intended use. A typical laundry basket measures 16” wide × 12” deep × 10” high. Sketch a simple net diagram including base, sides, and handles. - Cut Six Identical Panels for Each Side
For strength, each wall (front, back, left, right) and the base should be made from six stacked layers of cardboard. Trace your dimensions onto the cardboard and cut carefully using a straightedge and utility knife. - Glue Layers Together
Apply even coats of PVA glue between each layer. Press firmly and place under heavy books for at least 2 hours per batch. Repeat for all five main components: base, front, back, left side, right side. - Assemble the Box Frame
Once dry, arrange the four walls upright around the base. Apply glue along the bottom edges of each side and press onto the base. Reinforce inside corners with triangular cardboard gussets (cut right triangles with 2” legs). Clamp or tape in place until set (minimum 4 hours). - Add Internal Bracing (Optional)
To prevent bulging under weight, glue horizontal strips every 3 inches inside the upper half of the basket. These act like ribs and dramatically improve load-bearing capacity. - Create Handles
Cut two rectangular strips (2” wide × 8” long × 6 layers thick). Round the ends for comfort. Attach near the top edge of opposite sides using strong adhesive and reinforce with L-shaped cardboard brackets underneath. - Seal All Surfaces
Apply 2–3 coats of Mod Podge or clear varnish to every surface, allowing drying time between layers. This protects against humidity and increases scratch resistance. - Decorate the Exterior
Wrap sides with fabric using decoupage technique, or apply patterned contact paper. Trim excess neatly with a sharp blade. For a modern look, paint with matte acrylics in neutral tones.
Drying Timeline
- Layer bonding: 2 hours under pressure
- Frame assembly: 4–6 hours to fully cure
- Final sealing: 24 hours before regular use
Do’s and Don’ts of Cardboard Basket Building
| Do | Don't |
|---|---|
| Use double-wall corrugated cardboard for better rigidity | Use single-thin cardboard meant for small packages |
| Clamp glued joints tightly to ensure full adhesion | Leave joints unsupported during drying |
| Apply multiple sealant layers for moisture protection | Place the basket directly on damp floors (e.g., bathrooms) |
| Reinforce corners with internal supports | Overload the basket beyond 15 lbs without bracing |
| Customize with washable fabric liners | Expose to direct rain or outdoor conditions |
Real-Life Example: The Apartment-Sized Solution
Sophie, a city dweller in a 500-square-foot studio, needed a discreet way to store laundry without cluttering her space. Prefabricated baskets felt bulky and unattractive. She built a custom cardboard basket measuring 14” × 10” × 9”, designed to slide under her bed. Using navy-blue contact paper and gold-edged trim, she matched her bedroom theme perfectly. After sealing with three coats of polyurethane, the basket handled weekly loads of towels and clothes for over two years. Even after accidental spills, quick wiping preserved its integrity. “It looks so good,” she said, “my roommate thought I bought it from a boutique.”
Checklist: Build Your Own Cardboard Laundry Basket
- ☐ Gather at least six large, undamaged cardboard sheets
- ☐ Measure and sketch your desired basket dimensions
- ☐ Cut and laminate six layers for each panel
- ☐ Glue and clamp all panels; allow full drying time
- ☐ Assemble walls onto base with corner reinforcement
- ☐ Install and brace handles securely
- ☐ Seal all surfaces with protective coating
- ☐ Decorate with fabric, paint, or paper finish
- ☐ Let cure completely before first use
- ☐ Add a removable cotton liner for easier cleaning
Frequently Asked Questions
Can a cardboard basket really hold wet clothes?
No—never place soaking-wet laundry directly into a cardboard basket. While sealed and varnished surfaces resist light moisture, prolonged exposure will degrade the material. Use it for dry sorting or transporting clothes to the washer, not for storing damp loads.
How do I clean my cardboard basket?
Wipe the exterior with a slightly damp cloth and mild soap. Avoid soaking or scrubbing aggressively. For fabric-wrapped versions, consider a removable liner that can be machine washed separately.
Will the basket smell over time?
Only if exposed to persistent moisture or organic debris. To prevent odor, keep the basket in a ventilated area and occasionally wipe down with vinegar-dampened cloth (lightly applied). Adding a sachet of baking soda inside a linen pocket helps absorb ambient smells.
Make Sustainability Stylish
Building your own cardboard laundry basket proves that practicality and design don’t have to come at the planet’s expense. With thoughtful construction and a personal touch, you create more than storage—you craft a statement about mindful living. Whether you're furnishing a dorm, organizing a nursery, or reducing household waste, this project offers a rewarding blend of creativity and purpose. Start with one basket, refine your technique, and soon you might find yourself designing matching shelves, magazine holders, or toy bins—all from what once held a shipped package.
💬 Ready to turn trash into treasure? Share your cardboard creation online and inspire others to build smarter, greener storage today!