Decorating your home for the holidays often involves finding creative ways to display lights that are both festive and secure. Brick exteriors present a unique challenge: they’re durable and weather-resistant, but also tough to penetrate without the right tools and techniques. Many homeowners wonder whether it’s possible — and safe — to install permanent outdoor Christmas light tracks directly onto brick walls. The answer is yes, but with important caveats. With proper planning, materials, and installation methods, you can create a reliable, reusable lighting system that enhances your home’s curb appeal every holiday season.
Understanding Outdoor Light Tracks
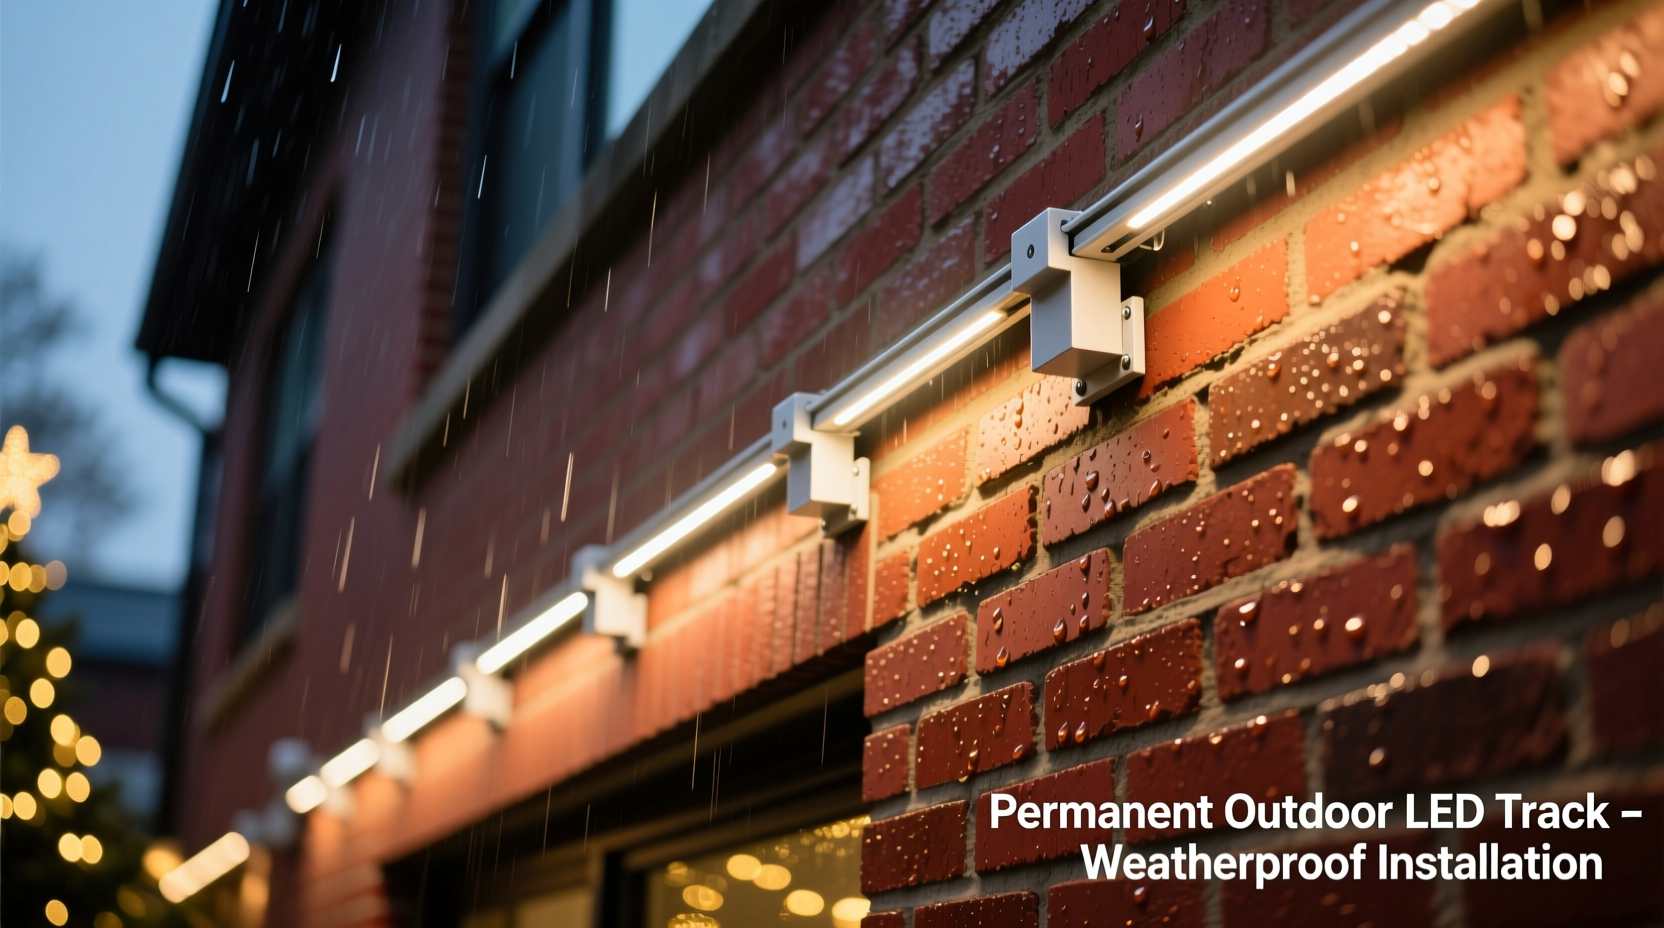
Outdoor Christmas light tracks are modular systems designed to hold strings of LED or incandescent lights in a clean, organized way. Unlike traditional string lights draped haphazardly, these tracks provide alignment, reduce tangling, and allow for quick setup and takedown. Some systems are temporary and clip onto gutters or fascia, while others are built for semi-permanent or permanent installation.
Permanent light tracks are typically made from UV-resistant PVC, aluminum, or polycarbonate. They feature channels or grooves where light clips or bulbs slide in securely. These systems are ideal for homes with consistent seasonal decor plans, especially when used year after year.
When considering brick as a mounting surface, it's essential to understand that brick is porous and can crack under stress if not drilled properly. Additionally, mortar joints behave differently than solid brick, affecting anchor strength and water resistance. Choosing the right hardware and method ensures longevity and prevents damage to your home’s exterior.
Tip: Always use anchors rated for masonry when installing into brick—standard drywall anchors will fail.Feasibility of Permanent Installation on Brick
Yes, you can permanently install outdoor Christmas light tracks on brick walls, but success depends on three factors: material compatibility, structural integrity, and weather exposure.
Brick is one of the most durable building materials available, capable of supporting significant weight over time. However, its hardness means standard screws won’t penetrate it—you’ll need specialized drill bits and fasteners. The key is anchoring into either the brick itself or the mortar joint between bricks, each with distinct advantages and drawbacks.
- Drilling into brick: Offers superior holding strength because brick is denser than mortar. Ideal for heavy-duty installations.
- Drilling into mortar: Easier on tools and less likely to cause cracking, but may degrade faster over time due to weathering and thermal expansion.
For permanent light track systems, drilling into the brick is generally recommended unless the brick is old or fragile. Newer, high-fired bricks handle drilling well, especially when done with a hammer drill and carbide-tipped masonry bit.
“Proper anchoring into solid brick provides up to five times more pull-out resistance than mortar joints. For any permanent fixture, brick penetration is the safer bet.” — Marcus Reed, Licensed Masonry Contractor & Exterior Systems Specialist
Step-by-Step Installation Guide
Installing permanent light tracks on brick requires precision and patience. Follow this timeline-based process to ensure a professional result.
- Plan Your Layout (1–2 hours)
Select the path for your light tracks. Use a laser level or chalk line to mark straight lines across the brick surface. Measure spacing between mounting holes on the track and transfer those points to the wall. - Gather Tools and Materials (30 minutes)
You’ll need:- Hammer drill with 3/16” or 1/4” carbide masonry bit
- Masonry anchors (e.g., sleeve anchors or Tapcon-style screws)
- Light track system with compatible mounting brackets
- Level, tape measure, pencil, safety goggles
- Vacuum or brush for dust removal
- Drill Pilot Holes (15–30 minutes per section)
Wear eye protection. Drill slowly at a steady pace to avoid overheating the bit. Blow out dust with compressed air or a small brush after each hole. - Insert Anchors (10 minutes)
Tap sleeve anchors into place until flush. If using threaded inserts like Tapcons, screw them in by hand first, then tighten with a drill. - Attach Mounting Brackets (15 minutes)
Align brackets with anchors and secure with stainless steel screws. Double-check alignment with a level before tightening fully. - Install Light Track (10 minutes)
Slide or snap the track into the brackets according to manufacturer instructions. Ensure all sections are connected tightly. - Test Lighting System (5 minutes)
Plug in test lights to confirm coverage and functionality. Adjust positioning if needed.
Allow 3–5 hours total for a typical two-story home facade. Work during dry weather to prevent moisture from entering freshly drilled holes.
Tip: Pre-drill all holes before inserting anchors—this avoids misalignment and saves time during final assembly.Do’s and Don’ts: Installing on Brick Walls
| Do’s | Don’ts |
|---|---|
| Use a hammer drill with carbide-tipped bits for clean holes | Use a regular drill—it won’t penetrate brick effectively |
| Choose stainless steel or coated fasteners to resist rust | Use untreated steel screws—they corrode quickly outdoors |
| Seal around anchors with silicone caulk to prevent water intrusion | Leave holes unsealed—moisture can lead to freeze-thaw damage |
| Space brackets every 16–24 inches for stability | Over-space brackets—tracks may sag under snow or wind load |
| Inspect annually for cracks, loose fittings, or corrosion | Ignore maintenance—small issues become major repairs |
Real-World Example: The Johnson Family Home Upgrade
The Johnsons live in a 1920s colonial with original red brick siding in upstate New York. Every December, they spent nearly two full weekends untangling lights, patching damaged clips, and struggling with inconsistent displays. After years of frustration, they invested in a permanent aluminum light track system.
They hired a contractor familiar with masonry work to install tracks along the roofline, porch columns, and front steps. The installer used 1/4” sleeve anchors drilled into solid brick, spaced every 18 inches. Each anchor was sealed with clear exterior-grade silicone. The entire system was completed in one day.
Now, the Johnsons spend less than an hour each November plugging in pre-wired LED strips. Their display is symmetrical, bright, and hassle-free. More importantly, their brickwork remains intact after five seasons, with no signs of cracking or water infiltration.
“It paid for itself in saved time and reduced stress,” says homeowner Linda Johnson. “And our neighbors always comment on how clean and professional it looks.”
Maintenance and Long-Term Care
A permanent installation isn’t “install and forget.” To ensure decades of reliable service, follow a seasonal maintenance routine.
- Fall Inspection: Before decorating, check each bracket for looseness, rust, or shifting. Tighten screws and reseal any cracked caulk.
- Winter Monitoring: After heavy snow or ice storms, visually inspect for bent tracks or accumulated weight. Gently remove snow buildup with a soft broom.
- Spring Cleanup: Once lights are removed, wipe down tracks with mild soapy water. Inspect wiring for fraying or rodent damage.
- Summer Assessment: Look for signs of efflorescence (white salt deposits) near anchors, which may indicate moisture migration. Address promptly with waterproof sealant.
Replace worn components immediately. Most manufacturers offer individual replacement brackets or end caps, avoiding the need for full system removal.
“Even the best-installed system degrades without care. Annual inspection is non-negotiable for longevity.” — Derek Lang, Building Envelope Consultant
FAQ: Common Questions About Brick-Mounted Light Tracks
Can I install light tracks on painted brick?
Yes, but only if the paint is firmly adhered. Peeling or flaking paint should be stripped before drilling. Paint doesn’t affect anchor strength, but weak substrate does. Test a small area first.
Will drilling into brick cause cracks?
Not if done correctly. Use a hammer drill at low speed and apply steady pressure. Avoid excessive force or side-to-side motion. Cracks usually occur when using the wrong tool or bit.
Are there non-invasive alternatives?
Yes, though not truly permanent. Magnetic tracks work on steel surfaces only. Adhesive-backed clips are unreliable on brick due to temperature swings and moisture. Suction mounts fail on porous surfaces. For durability, mechanical fastening remains the best option.
Checklist: Preparing for Your Installation
Before starting your project, ensure you have everything in place.
- ☐ Choose a light track system rated for outdoor and permanent use
- ☐ Confirm compatibility with your preferred bulb type (C7, C9, mini LED, etc.)
- ☐ Mark desired layout using a level and chalk line
- ☐ Purchase masonry anchors and stainless steel screws (minimum 1.5” length)
- ☐ Acquire a hammer drill and correct-sized carbide masonry bit
- ☐ Buy exterior-grade silicone caulk for sealing
- ☐ Schedule installation during dry, mild weather
- ☐ Test-fit brackets and track sections before final mounting
- ☐ Plan annual maintenance reminders on your calendar
Conclusion: A Lasting Holiday Tradition
Installing permanent outdoor Christmas light tracks on brick walls is not only possible—it’s a smart investment for homeowners who value tradition, aesthetics, and efficiency. When executed with quality materials and attention to detail, these systems deliver years of effortless holiday cheer without damaging your home’s exterior.
The initial effort pays dividends in simplified setup, improved safety, and a consistently stunning display. Whether you're illuminating a historic townhouse or a modern suburban home, brick can support your vision with the right approach.
💬 Ready to transform your holiday lighting? Start planning your permanent track system today—your future self will thank you next Christmas morning.