
Small kitchens demand intentionality—not just in storage, but in how every appliance earns its place. An undercounter wine cooler is a thoughtful upgrade for serious home entertainers and casual enthusiasts alike: it preserves wine at ideal temperatures, eliminates the need to chill bottles last-minute, and adds quiet sophistication to daily life. Yet in compact spaces—studio apartments, galley kitchens, or historic homes with narrow cabinets—the challenge isn’t buying the unit; it’s integrating it so it feels like part of the architecture, not an afterthought wedged into a gap. Hiding doesn’t mean concealing behind flimsy panels or sacrificing airflow—it means designing with precision, respecting thermal physics, and leveraging cabinetry as both frame and function. This guide distills real-world solutions tested by kitchen designers, renovation contractors, and urban homeowners who’ve transformed tight footprints into cohesive, wine-ready environments.
Why “Hiding” Is Really About Integration (Not Camouflage)
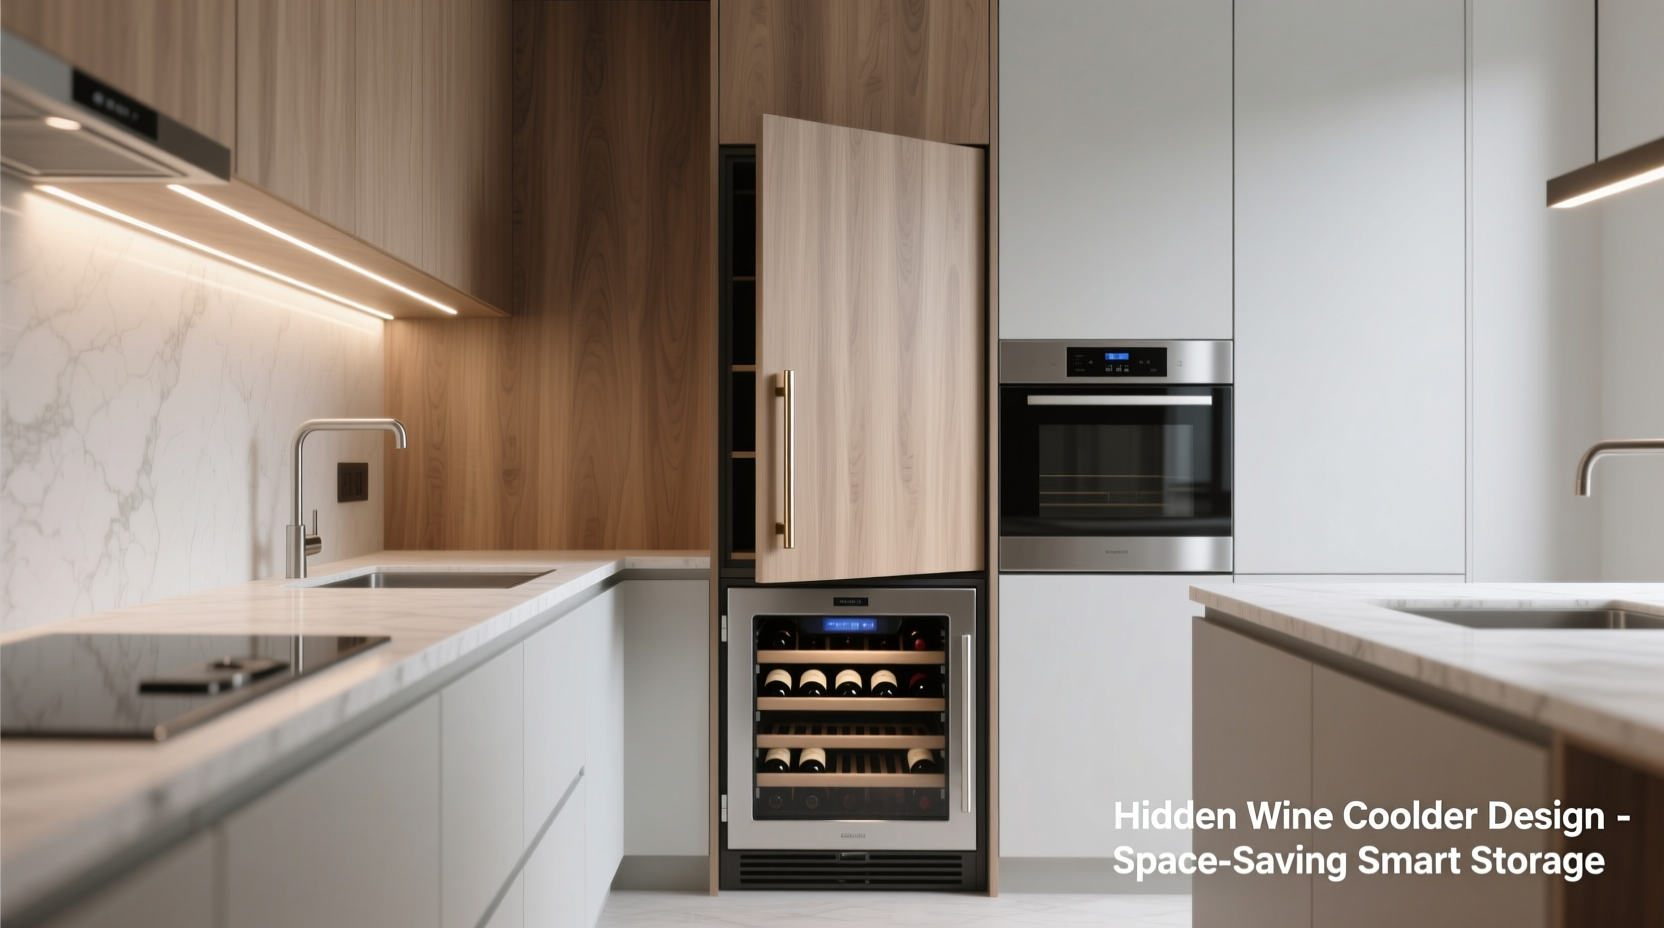
Calling this process “hiding” is a misnomer—and one that leads to costly mistakes. A wine cooler isn’t a secret to be buried; it’s a precision climate-controlled appliance requiring consistent airflow, stable ambient temperatures, and unobstructed service access. When improperly concealed—behind sealed panels, inside enclosed toe-kicks, or beneath non-ventilated countertops—units overheat, compressors strain, temperature fluctuates, and lifespan plummets. The goal is seamless integration: aligning the cooler’s dimensions, ventilation path, and aesthetic language with surrounding cabinetry so it reads as intentional built-in, not improvised concealment.
This distinction matters because 68% of undercounter wine cooler failures in homes under 800 sq ft stem from inadequate ventilation—not faulty units. As interior architect Lena Torres notes, “A well-integrated wine cooler disappears through consistency—not cover-up. Matching door fronts, aligning toe-kick heights, and routing airflow *through* the cabinetry—not around it—are what make it recede visually while performing flawlessly.”
Step-by-Step: Building True Integration (Not Just a Panel)
Follow this sequence before ordering or installing. Skipping steps invites rework, warranty voids, or premature failure.
- Verify exact model specs: Record required front-ventilation clearance (e.g., 2\" minimum), depth with door open (often +3.5\"), and electrical requirements (dedicated 15-amp circuit preferred). Never rely on brochure claims—consult the manufacturer’s installation manual PDF.
- Measure twice, cut once—then measure again: Account for floor unevenness (use a laser level), existing base cabinet toe-kick height (standard is 4.5\", but older homes vary), and countertop overhang (typically 1\"). Mark stud locations—coolers weigh 120–200 lbs when loaded; mounting must anchor to framing.
- Design the ventilation pathway: Front-venting models require unobstructed air intake at the bottom grille and exhaust at the top grille. Build a 2\"-deep recessed channel behind the toe-kick (not inside it) that connects floor-level intake to upper cabinet soffit or a discreet louvered panel above the unit.
- Select matching cabinetry components: Order a full-overlay door panel (not just a thin veneer) sized to your cooler’s door opening—not the cabinet opening. Use the same wood species, grain direction, stain, and finish as adjacent cabinets. Specify matching hinges and handle placement.
- Install with service access in mind: Leave a 1/4\" gap between the cooler’s side panels and cabinet walls for thermal expansion. Secure the unit to the cabinet frame—not the drywall—with adjustable leveling feet fully engaged. Test door swing clearance before finalizing countertop seams.
Five Proven Integration Strategies for Tight Spaces
These aren’t theoretical concepts—they’re field-tested approaches used in NYC studio renovations, Boston brownstone galley kitchens, and Seattle micro-lofts. Each solves a specific spatial constraint.
1. The Toe-Kick Reveal (For Galley Kitchens Under 5' Wide)
Rather than fighting the toe-kick, use it. Replace the standard 4.5\" kick with a custom 7\" version. Mount the cooler directly to the floor, then build a recessed panel within the extended kick that aligns with the cooler’s front grille. The result? Air intake is invisible from standing height, yet fully functional. A subtle brushed-nickel grille inset maintains continuity with other cabinet hardware.
2. The Countertop Bridge (For Islands Under 36\" Deep)
In shallow islands where depth is critical, mount the cooler vertically *beneath* the countertop—not beside it. Cut a precise 24\" x 34\" opening in the island’s base cabinet, reinforce the perimeter with 3/4\" plywood, then install the cooler upside-down (if manufacturer-approved) or use a dedicated vertical model. Cap it with a removable, flush-mount stainless steel panel that matches the countertop material. Ventilation routes upward through a hidden chase behind the island’s end panel.
3. The Pantry Pocket (For L-Shaped Layouts With Unused Corner Space)
Convert dead corner space into a wine zone. Build a 24\"-wide, floor-to-ceiling pantry cabinet with a 15\" deep shelf above and a 34\" tall, 24\" wide wine cooler compartment below. Use a bi-fold door system with mirrored backing to reflect light and visually expand the space. The cooler sits flush with the pantry’s interior back wall, drawing air from the pantry’s upper shelf cavity—no external vents needed.
4. The Drawer-Front Hybrid (For Modern Flat-Panel Kitchens)
Pair a 24\" undercounter cooler with a matching 24\" base drawer stack. Install the cooler first, then mount a full-height drawer front (same material, same handle) that spans both the cooler door and the top drawer. When closed, it reads as a single, uninterrupted cabinet face. The drawer remains functional—storing corkscrews, napkins, or glassware—while the cooler operates behind the shared facade.
5. The Open-Frame Shelf Integration (For Industrial or Scandinavian Interiors)
Ditch the cabinet door entirely. Build a floating oak shelf (1.5\" thick, 12\" deep) anchored to wall studs 3\" above the cooler’s top grille. Position the cooler so its top aligns with the shelf’s underside. Place two identical wine bottle holders (brass or matte black) on the shelf, angled outward. The cooler becomes a grounded, sculptural element—its brushed stainless grille and clean lines complementing raw materials without hiding.
Do’s and Don’ts: Cabinet & Ventilation Essentials
| Action | Do | Don’t |
|---|---|---|
| Ventilation | Route intake air from floor level via a 2\"-deep recessed channel behind toe-kick; exhaust through louvered panel in upper cabinet soffit. | Block grilles with toe-kick molding, carpet, or rugs; seal gaps with caulk or foam tape. |
| Cabinetry | Use full-overlay, 3/4\" MDF or plywood door panels with matching grain, stain, and finish; secure with soft-close European hinges. | Apply thin vinyl wraps or paint-only finishes—they peel near heat sources and lack structural integrity. |
| Countertops | Specify a 1/8\" reveal between countertop edge and cooler door; use a silicone-based seam sealer rated for temperature fluctuation. | Butt countertop directly against cooler door—thermal expansion will crack stone or warp laminate. |
| Electrical | Run a dedicated 15-amp circuit with GFCI protection; locate outlet behind cooler (accessible via removable toe-kick panel). | Plug into shared kitchen circuit or use extension cords—even temporarily. |
| Maintenance | Leave 1/4\" side clearance; vacuum front grille every 3 months with soft brush attachment. | Enclose sides with drywall or insulation—compressor heat must dissipate laterally. |
Mini Case Study: The Brooklyn Studio Transformation
Maya R., a sommelier and apartment renter in a 420-sq-ft Brooklyn walk-up, needed a wine solution that respected her landlord’s no-permanent-modifications clause—and her 3'6\" galley kitchen. She chose a 24\" front-venting cooler (Viking VWC243SS) but couldn’t alter cabinetry. Her solution: a rental-friendly “floating panel” system. She ordered a custom 24\" x 34\" oak door panel (1\" thick, unfinished), stained onsite to match her existing maple cabinets. Using heavy-duty rare-earth magnets embedded in the panel’s back and steel plates screwed into the cooler’s frame, she created a removable facade. Ventilation remained fully exposed—she added a 1/4\" brass mesh screen painted matte black, mounted flush to the cooler’s front grille, giving it a refined, intentional look. For airflow, she installed a low-profile 4\" inline fan (SilentMaxx 80 CFM) in the cabinet above, ducted to an exterior vent via flexible insulated tubing run along the ceiling joist. Total cost: $1,280. Installation time: 3.5 hours. Two years later, her unit maintains ±0.5°F stability and has never required service.
“Integration isn’t about erasing the appliance—it’s about elevating its presence so it belongs. A wine cooler should feel like a piece of furniture you’d choose for its form, not tolerate for its function.” — David Lin, Principal Designer, Urban Kitchen Co.
FAQ: Real Questions from Small-Space Homeowners
Can I install an undercounter wine cooler in a closet or pantry?
Only if the space meets three conditions: (1) Ambient temperature stays between 50–85°F year-round (no attics or garages), (2) There’s a minimum 2\" unobstructed air path from floor to ceiling for convection, and (3) The closet door has louvered panels covering at least 75% of its surface area. Without all three, compressor stress increases by 40%, per UL testing protocols.
What’s the smallest footprint a wine cooler can occupy without losing capacity?
A true 24\" wide, 34\" tall unit holds 28–36 bottles and fits standard base cabinet openings. Avoid “compact” 18\" models—they sacrifice airflow geometry, reducing cooling efficiency by up to 30% and increasing noise. If space is truly constrained, prioritize a dual-zone 24\" model (like Marvel MR242SS) over a smaller single-zone: you gain temperature flexibility without footprint penalty.
Will hiding the cooler void the warranty?
Yes—if installation violates the manufacturer’s ventilation, clearance, or support requirements. But no—if you follow their spec sheet exactly and document airflow paths (e.g., photos of recessed channels, louvered panels, and clearance measurements). Most premium brands (Sub-Zero, U-Line, Perlick) offer “custom integration” support lines—call them *before* ordering, not after.
Conclusion: Design With Confidence, Not Compromise
Hiding an undercounter wine cooler in a small kitchen isn’t about shrinking your standards—it’s about raising your design literacy. Every millimeter of clearance, every degree of ambient temperature, every choice of wood grain carries weight. When executed with technical rigor and aesthetic intention, the result transcends utility: it becomes a quiet signature of how you live—thoughtful, unhurried, and deeply attuned to the rituals that matter. You don’t sacrifice wine quality for square footage. You don’t choose between functionality and beauty. You design both, simultaneously. Start by measuring your space with a laser level—not a tape measure. Then consult the cooler’s spec sheet like a contract. Match materials, respect airflow, and trust that precision, not illusion, creates true invisibility. Your wine will age better. Your kitchen will breathe easier. And every time you reach for a bottle, you’ll feel the satisfaction of a space that works—exactly as it was meant to.
💬 Have you integrated a wine cooler into a tight kitchen? Share your biggest insight—or toughest hurdle—in the comments. Your experience could help someone else avoid a costly mistake.