There’s nothing worse than falling in love with a pair of shoes only to find they pinch, rub, or feel too snug after just minutes of wear. Whether it’s a new leather boot, a vintage find, or designer heels that run small, tight shoes can quickly turn comfort into agony. But before you relegate them to the back of the closet—or worse, throw them away—consider this: most tight shoes can be gently and safely stretched at home.
The key is patience and using the right method for your shoe material. Rushing the process or using aggressive techniques can permanently damage the structure, finish, or sole. With careful application of moisture, cold, heat, and pressure, you can reshape your footwear to match your foot’s contours without compromising quality.
Understanding Shoe Materials and Stretch Potential
Not all shoes respond the same way to stretching. The material determines how much give it has and which methods will work best. Knowing what your shoes are made of helps you choose the safest approach.
- Leather: Naturally flexible and responds well to moisture-based stretching. Full-grain leather stretches more than corrected grain or patent finishes.
- Suede & Nubuck: Porous and delicate. Requires gentle treatment to avoid water stains or texture changes.
- Fabric (canvas, mesh, knit): Can stretch slightly but is more prone to warping if over-saturated.
- Synthetic materials (polyurethane, vinyl): Minimal natural stretch. Best suited for mechanical stretching or professional help.
“Shoe stretching isn’t about forcing shape—it’s about encouraging the material to adapt gradually.” — Daniel Reyes, Footwear Restoration SpecialistTip: Always test any liquid solution on an inconspicuous area first, especially with suede or dyed leather.
Step-by-Step Guide to Home Shoe Stretching
Below is a comprehensive, five-step process that combines proven household techniques with expert timing and safety checks. Follow these steps carefully to maximize results without risking damage.
- Assess Fit and Identify Pressure Points
Wear the shoes with the socks you typically use. Walk around for 5–10 minutes and note where discomfort occurs—common areas include the toe box, ball of the foot, heel, and sides. Mark problem zones lightly with chalk or mental notes. - Clean the Shoes
Remove dirt and oils with a soft cloth. For leather, use a pH-balanced cleaner. Suede should be brushed with a specialized eraser or brush. A clean surface ensures even absorption during moisture treatments. - Choose Your Stretch Method Based on Material
Select one primary technique from the options below. Avoid combining multiple aggressive methods at once. - Apply the Stretch Over 24–72 Hours
Most methods require repeated applications and drying cycles. Never rush by using direct heat sources like hairdryers or radiators, as they can crack leather or warp glue. - Test and Repeat if Needed
After each full cycle, wear the shoes briefly to assess improvement. If still tight, repeat the process once more. More than two rounds may degrade adhesives or stitching.
Effective Home Stretching Methods
Each method below targets different materials and tightness levels. Choose based on your shoe type and available supplies.
1. The Frozen Water Bag Technique (Ideal for All Materials)
This method uses water expansion to gently push outward where needed.
- Fill two sandwich-sized plastic bags with water, removing excess air before sealing.
- Place one bag inside each shoe, positioning it in the tightest area (e.g., toe box).
- Put the shoes in the freezer overnight.
- As the water freezes, it expands, applying slow, even pressure.
- Remove and let thaw completely before testing fit.
2. Alcohol and Heat Method (Best for Leather and Synthetic)
Rubbing alcohol breaks down fibers temporarily, allowing reshaping when worn.
- Mix equal parts rubbing alcohol and water in a spray bottle.
- Spray the solution inside the shoe, focusing on pressure zones.
- Wear thick socks and put on the shoes while damp.
- Use a hairdryer on low heat to warm the material for 30 seconds at a time, then walk around for 10 minutes.
- Let shoes cool while still on your feet to set the new shape.
3. Potato Stuffing (Natural Expansion for Toes)
A rustic but effective trick for rounded toe boxes that feel cramped.
- Peel a raw potato and cut it to fit snugly into the toe area.
- Insert into the shoe and leave for 24–48 hours.
- The potato absorbs moisture from the shoe and swells slightly, pushing outward.
- Replace with a fresh potato if needed.
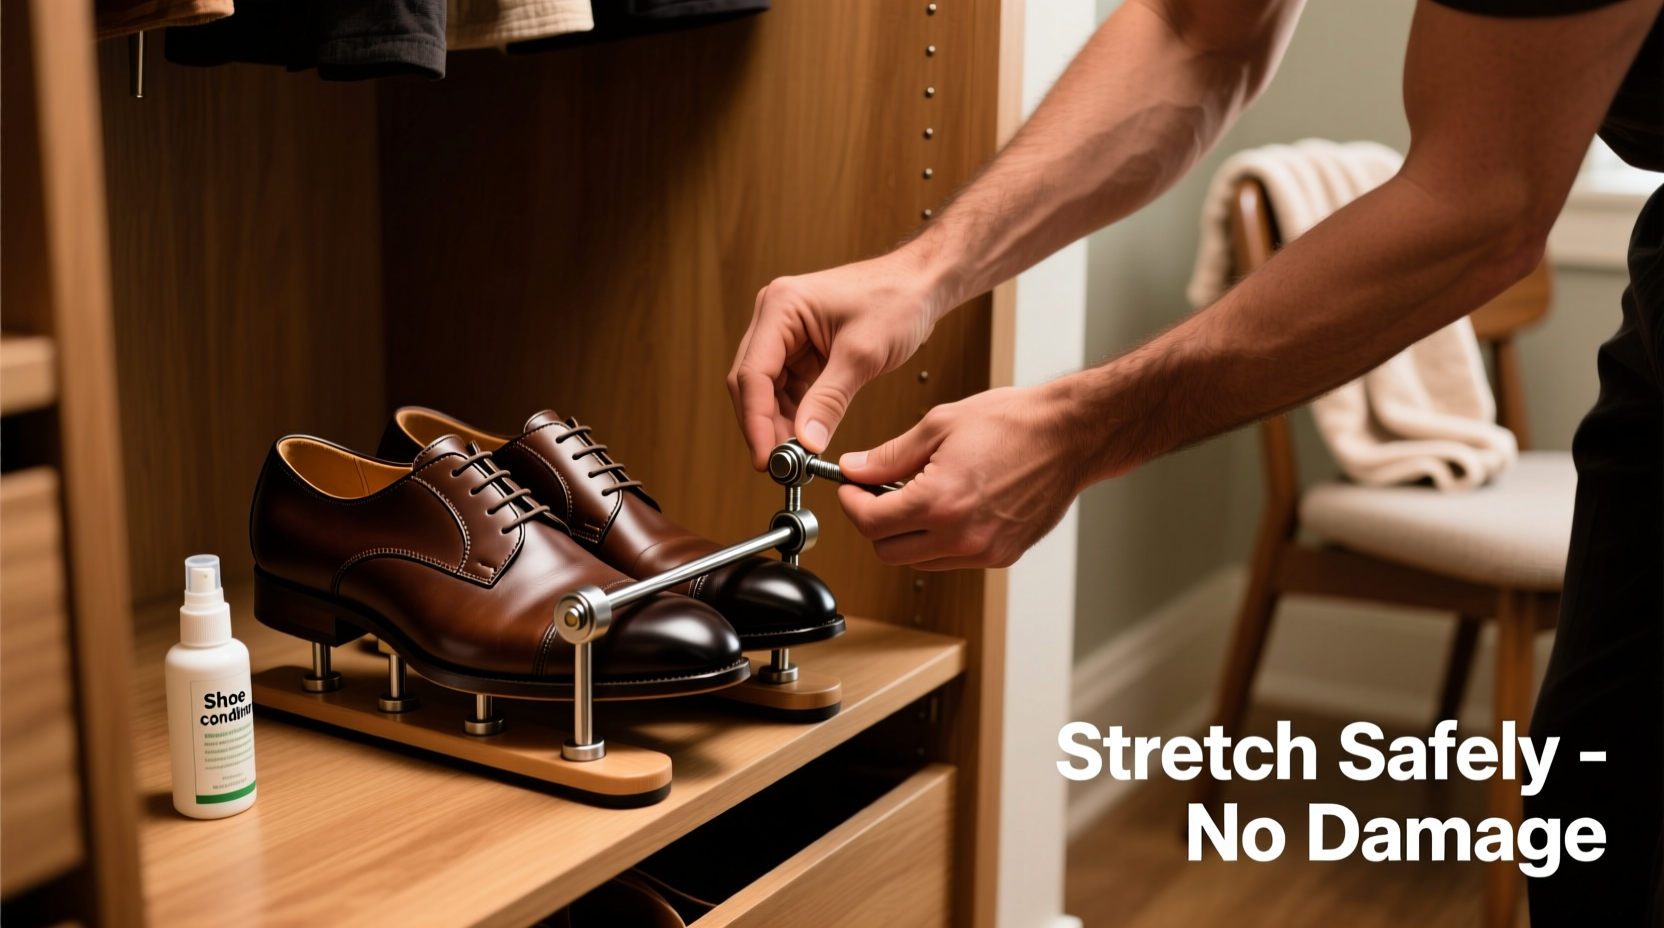
4. Shoe Stretcher Use (Precision Control)
Investing in a wooden shoe stretcher gives consistent results over time.
- Adjust the width and length knobs to apply mild tension.
- Insert into shoes overnight.
- For added effect, apply stretching spray or diluted alcohol to interior first.
- Rotate direction weekly to target different zones.
Do’s and Don’ts of Home Shoe Stretching
| Do’s | Don’ts |
|---|---|
| Test liquids on hidden areas first | Soak shoes completely in water |
| Stretch gradually over multiple days | Use boiling water or open flame |
| Use shoe trees when not wearing them | Wear stretched shoes immediately for long periods |
| Condition leather after stretching | Stretch glued soles excessively |
| Combine stretching with proper socks | Expect synthetic materials to stretch like leather |
Mini Case Study: Reviving Vintage Oxfords
Sophie, a 32-year-old archivist in Portland, inherited a pair of 1940s brown oxfords from her grandmother. They were beautiful—but painfully tight across the instep. She tried wearing them with thin socks, but blisters formed within 15 minutes.
After researching safe methods, she opted for the frozen water bag technique. She placed sealed water bags in the instep area and froze them overnight. After three cycles (with 12-hour thawing between), she noticed visible widening. She followed up with a leather conditioner to restore suppleness.
The result? The oxfords now fit comfortably with medium-weight socks. “They still have structure,” she said, “but they don’t fight my feet anymore.”
Checklist: Safe Shoe Stretching at Home
Follow this checklist to ensure you’re stretching correctly and safely:
- ☐ Identify exact areas of tightness
- ☐ Confirm shoe material type
- ☐ Clean interior and exterior surfaces
- ☐ Choose one appropriate method (not multiple)
- ☐ Test liquid solutions on small areas first
- ☐ Apply gradual pressure or moisture
- ☐ Allow full drying time between attempts
- ☐ Condition leather post-stretching
- ☐ Monitor for signs of glue separation or seam stress
- ☐ Stop if material cracks or deforms
When to Seek Professional Help
While home methods work for minor to moderate tightness, some situations call for a cobbler.
- Major size discrepancy: If the shoe is more than half a size too small, professional stretching machines offer stronger, controlled expansion.
- Structural adjustments: Heel narrowing, toe puff modification, or insole replacement require tools beyond home kits.
- Delicate materials: Patent leather, exotic skins, or bonded fabrics often need specialized solvents and clamps.
Many cobblers offer targeted stretching for $20–$50, preserving value and extending wear life far longer than buying new pairs.
FAQ
Can I stretch shoes that are already worn?
Yes, but with caution. Worn shoes may have weakened stitching or compressed padding. Focus on gentle methods like shoe stretchers or short wearing sessions with thick socks. Avoid freezing or alcohol if the material is dry or cracked.
How long does it take to stretch shoes at home?
Most effective results appear after 24 to 72 hours of treatment, often requiring multiple cycles. Immediate fixes are rare and risky. Plan for 3–5 days of gradual adjustment for optimal comfort and durability.
Will stretching ruin the appearance of my shoes?
If done correctly, no. Proper stretching maintains the shoe’s silhouette while improving fit. However, over-stretching can cause bulging, creasing, or sole detachment. Stick to recommended durations and monitor changes closely.
Conclusion
Stretching tight shoes at home is not only possible—it’s a smart way to protect your investment and reduce waste. By understanding your shoe’s material, applying gentle pressure through freezing, moisture, or controlled wear, and avoiding common pitfalls, you can transform uncomfortable footwear into daily companions.
Patience pays off. Rushing leads to cracks, peeling, or warped shapes. But with careful attention and the right technique, even stubborn shoes can adapt to your feet. Try one method at a time, track progress, and condition materials afterward to keep them looking and feeling their best.
💬 Have a pair of tight shoes you’ve successfully stretched? Share your story or tip in the comments—your experience could help someone else save their favorite footwear!