Terrariums bring a slice of the natural world into homes and offices, especially where sunlight is limited. Unlike traditional houseplants that demand bright conditions, certain species thrive in shaded environments. A well-designed terrarium for low light plants creates a self-sustaining ecosystem that requires minimal maintenance while adding aesthetic charm. Whether you're working with a dimly lit apartment corner or a windowless office desk, this guide walks you through every stage of creating a thriving, closed or open terrarium using shade-tolerant greenery.
Why Choose Low Light Plants for Terrariums?
Not all spaces are blessed with abundant natural light. Many urban dwellers face challenges with north-facing rooms or interior spaces far from windows. This doesn’t mean you have to forgo indoor greenery. Low light plants are naturally adapted to forest understories, where sunlight filters through dense canopies. These adaptations make them ideal candidates for terrarium cultivation.
Additionally, terrariums help regulate moisture and humidity—two factors that benefit many shade-loving plants. When paired correctly, these plants can flourish in enclosed or semi-enclosed containers for months without needing frequent watering or pruning.
“Terrariums are microcosms of resilience. With the right plant choices and structure, they can thrive even in the most light-deprived environments.” — Dr. Lena Torres, Botanical Ecologist
Essential Materials and Tools
Before diving into construction, gather all necessary components. The success of your terrarium depends not only on plant selection but also on proper layering and container choice.
Container Options
- Glass jars: Repurposed mason jars or large pickle jars work well for small-scale projects.
- Apothecary jars: Offer an elegant look with wide mouths for easy access.
- Fish tanks or aquariums: Ideal for larger displays with multiple plant layers.
- Bottle terrariums: Narrow-necked bottles require special tools (like long tweezers) but create striking visual effects.
Core Components
- Drainage layer: Small stones, pebbles, or LECA (lightweight expanded clay aggregate).
- Activated charcoal: Prevents mold and odors by filtering water and breaking down impurities.
- Substrate barrier: A piece of landscape fabric or coffee filter to prevent soil from mixing with drainage material.
- Potting mix: Use a lightweight, well-draining soil blend—avoid standard garden soil.
- Plants: Select compact, slow-growing species tolerant of low light and high humidity.
- Decorative elements: Moss, driftwood, figurines, or colored sand to personalize your design.
Choosing the Right Low Light Plants
Selecting appropriate plants is critical. Not all low-light species tolerate the humid, stagnant air of a sealed terrarium. Focus on those with small leaves and modest growth habits.
| Plant Name | Light Needs | Humidity Tolerance | Notes |
|---|---|---|---|
| Ferns (e.g., Maidenhair, Button Fern) | Low to medium indirect | High | Sensitive to dry air; best in closed terrariums |
| Pilea glauca | Low to bright indirect | Moderate to high | Trailing habit adds dimension |
| Peperomia species | Low to medium | Moderate | Diverse foliage; compact size |
| Fittonia (Nerve Plant) | Low to medium indirect | Very high | Vibrant veined leaves; needs consistent moisture |
| Moss varieties (e.g., Sheet Moss, Cushion Moss) | Very low indirect | Extremely high | Excellent ground cover; enhances humidity retention |
Avoid fast-growing or moisture-sensitive plants like succulents and cacti, which prefer dry conditions and plenty of light. Also steer clear of plants prone to rot in humid environments, such as some Calatheas, unless carefully monitored.
Step-by-Step Assembly Guide
Follow this structured process to build a healthy, visually appealing terrarium that lasts.
Step 1: Clean and Prepare the Container
Wash the glass thoroughly with warm, soapy water and dry completely. Residual oils or dust can encourage bacterial growth. If using a narrow bottle, sterilize tools (tongs, spoons) with rubbing alcohol before use.
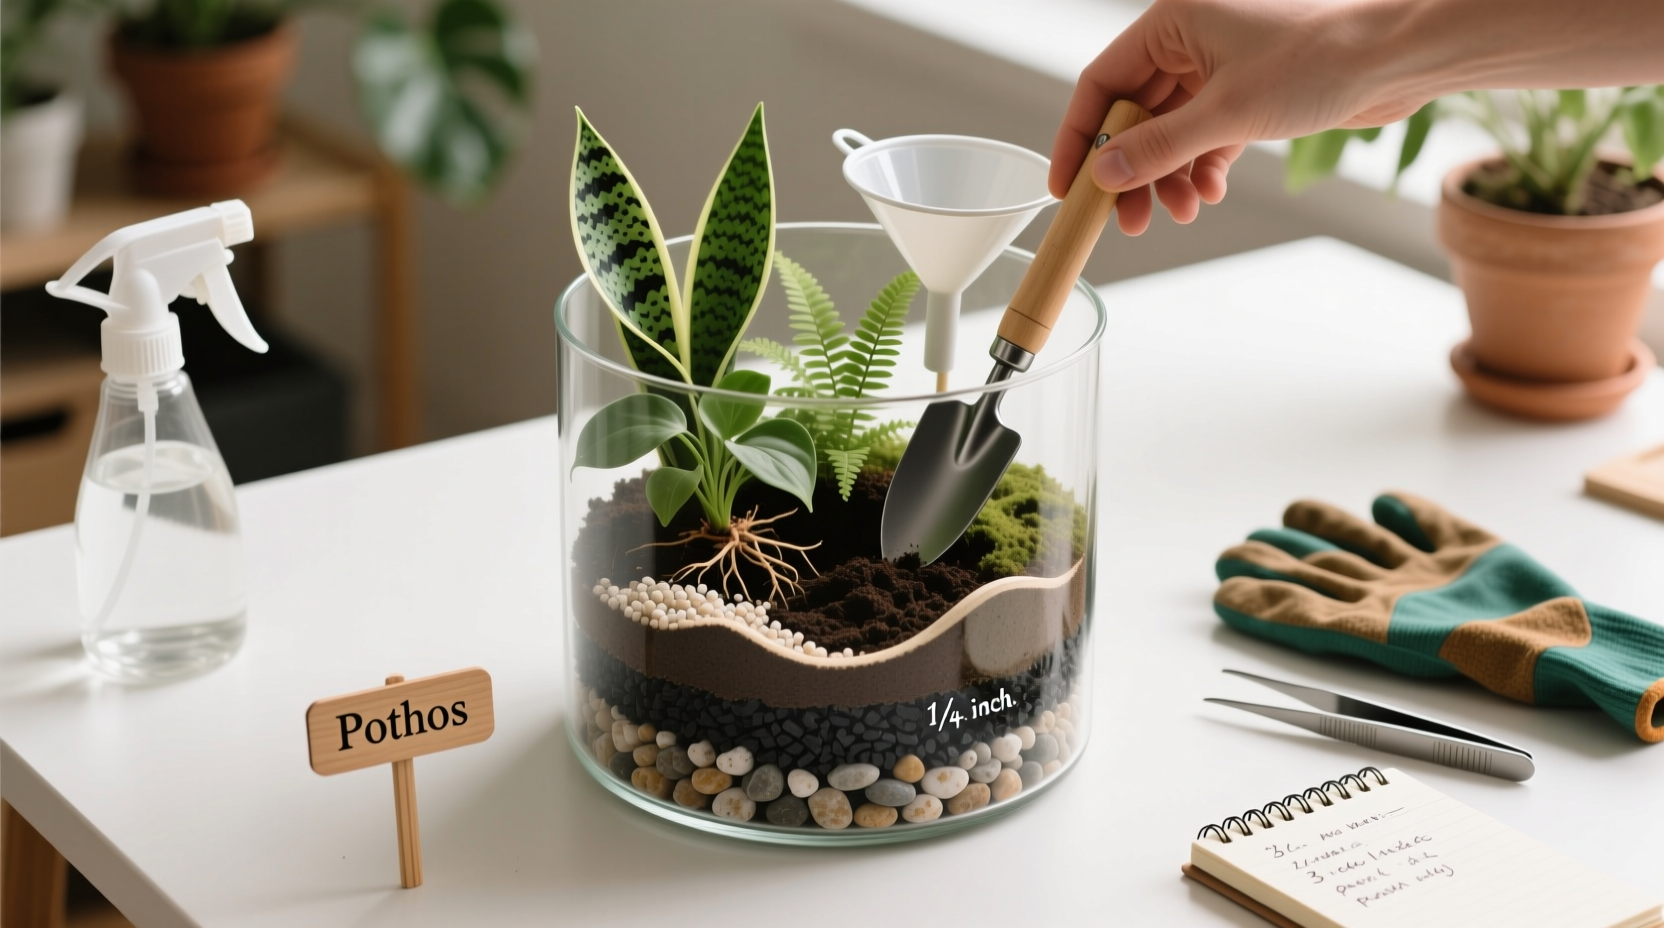
Step 2: Add the Drainage Layer (1–2 inches)
Place clean pebbles or small rocks at the bottom. This prevents root rot by allowing excess water to drain away from the soil. Aim for about 1 inch in small containers, up to 2 inches in deeper ones.
Step 3: Sprinkle Activated Charcoal
Add a thin layer (¼ to ½ inch) of activated charcoal over the stones. This keeps the environment fresh by absorbing toxins and inhibiting fungal development. It's especially important in closed systems where air circulation is limited.
Step 4: Insert Substrate Barrier
Lay a permeable barrier such as landscaping fabric or a doubled coffee filter over the charcoal. This stops soil from seeping into the drainage layer while still allowing water to pass through.
Step 5: Add Potting Mix (2–3 inches)
Use a moistened, peat-based or coco coir mix enriched with perlite for aeration. Fill to a depth that accommodates root systems—typically 2–3 inches depending on plant size. Gently press down to eliminate large air pockets.
Step 6: Plant Your Selection
Dig small holes with a spoon or pencil. Remove plants from their nursery pots, loosen roots slightly, and place them into the soil. Space them to allow for growth. Position taller plants toward the back or center, trailing types near edges. Press soil gently around each base.
Step 7: Decorate and Finalize
Add decorative moss to cover bare soil and increase humidity retention. Incorporate small stones, miniature figurines, or pieces of bark for visual interest. Mist lightly after planting to settle the soil.
Step 8: Seal or Leave Open
If creating a closed terrarium, place the lid on loosely at first. Observe condensation levels over the next few days. Heavy fogging indicates too much moisture—leave the lid off for a day to balance it. Once stable, maintain partial coverage to regulate airflow.
Tip: Water sparingly during setup. Overwatering is the leading cause of early terrarium failure.Maintenance and Troubleshooting
A successful terrarium should function as a nearly self-sufficient ecosystem. However, occasional intervention ensures longevity.
Watering Schedule
In a closed system, water may recycle via condensation. Only add more when no droplets appear on the glass for several days. Use a spray bottle or dropper to apply small amounts directly to the soil. Open terrariums dry out faster and may need misting every 1–2 weeks.
Light Requirements
Place your terrarium in an area with consistent, indirect light. Avoid direct sunlight—even brief exposure can turn the glass into a magnifying lens, scorching plants. North-facing windowsills or fluorescent-lit desks are ideal.
Pruning and Cleaning
- Trim yellowing or overgrown leaves with sterile scissors.
- Remove dead plant matter promptly to prevent mold.
- Wipe inner glass with a soft cloth if algae build-up occurs.
Common Issues and Solutions
- Mold or Fungus Growth
- Caused by excess moisture or decaying matter. Remove affected areas, improve airflow, and reduce watering.
- Foggy Glass with No Condensation Cycles
- Indicates poor ventilation or microbial imbalance. Open the lid for 24 hours and check drainage layers.
- Wilting or Yellowing Leaves
- Could signal overwatering, poor drainage, or incompatible plant species. Assess root health and adjust care routine.
Real-Life Example: Sarah’s Office Oasis
Sarah, a graphic designer in a windowless workspace, struggled to keep any plant alive. After researching low-maintenance options, she built a 3-gallon apothecary jar terrarium using Fittonia, Pilea glauca, and sheet moss. She placed it under her desk lamp, which provided consistent artificial light for 8 hours daily. Within weeks, the Fittonia spread its colorful veins across the soil, and the Pilea began trailing elegantly over the sides. By opening the lid weekly for 30 minutes, she prevented mold and maintained freshness. Eight months later, her terrarium remains vibrant—proof that even the darkest corners can host life.
Checklist: Building Your Low Light Terrarium
- Choose a clean, transparent container with adequate size
- Layer 1–2” of pebbles for drainage
- Add ¼–½” activated charcoal
- Insert fabric or coffee filter barrier
- Pour 2–3” of moist potting mix
- Select 2–4 compatible low-light plants
- Plant carefully, spacing for growth
- Top with moss or decorative elements
- Mist lightly and monitor condensation
- Place in indirect or artificial light
- Adjust ventilation based on moisture levels
Frequently Asked Questions
Can I use tap water in my terrarium?
Yes, but let it sit uncovered for 24 hours to allow chlorine to evaporate. Alternatively, use distilled or rainwater to avoid mineral buildup that can harm sensitive plants.
How often should I feed my terrarium plants?
Rarely. Most terrariums don’t require fertilizer due to slow growth and nutrient recycling. If needed, apply a diluted, organic liquid fertilizer once every 6–12 months at ¼ strength.
What if my terrarium starts to smell?
An unpleasant odor usually means anaerobic bacteria are present due to waterlogging. Immediately remove the lid, let the soil dry slightly, and check root health. Consider replanting with improved drainage if the issue persists.
Caring for Your Creation Long-Term
A terrarium is not just a decoration—it’s a living system that responds to its environment. Observe it regularly. Look for signs of balance: gentle condensation in the morning that clears by afternoon, steady growth without legginess, and clean foliage. Rotate the container occasionally for even light exposure, especially under directional lamps.
Over time, you may notice one plant outgrowing others. This is normal. Instead of removing it, consider propagating cuttings to start a new terrarium. Many low-light species, like Pilea and Fittonia, root easily in water or moist soil.
“The beauty of a terrarium lies in its quiet persistence. It teaches patience, observation, and harmony with nature—even in the smallest spaces.” — Marcus Reed, Urban Horticulturist
Start Growing Today
Creating a DIY terrarium for low light plants is more than a craft project—it’s an invitation to connect with nature in a sustainable, mindful way. With simple materials and thoughtful planning, you can transform overlooked spaces into lush, breathing ecosystems. Whether you’re nurturing your first fern or designing a multi-tiered display, each step brings you closer to a greener, calmer environment.
💬 Ready to build your own? Share your terrarium journey in the comments—photos, tips, or questions welcome!