There’s a quiet magic in the way light filters through fabric—especially when it’s Christmas time. One of the most elegant and understated ways to elevate your holiday decor is by layering Christmas lights beneath sheer tulle. The result? A diffused, ethereal glow that feels both intimate and festive. Unlike stark strands of exposed bulbs, this technique softens the brightness, creating an ambiance reminiscent of candlelight or starlight caught in gauzy clouds.
This method works beautifully on windows, ceilings, walls, bed canopies, and even outdoor patios. Whether you're decorating a nursery, living room, or event space, combining tulle with string lights adds dimension and warmth without overwhelming the senses. But achieving that dreamy look requires more than just draping fabric over bulbs. It's about thoughtful layering, proper materials, and attention to detail.
Done right, the layered effect becomes a centerpiece of calm elegance in a season often defined by sensory overload. Here’s how to create it with confidence and precision.
Why This Technique Works So Well
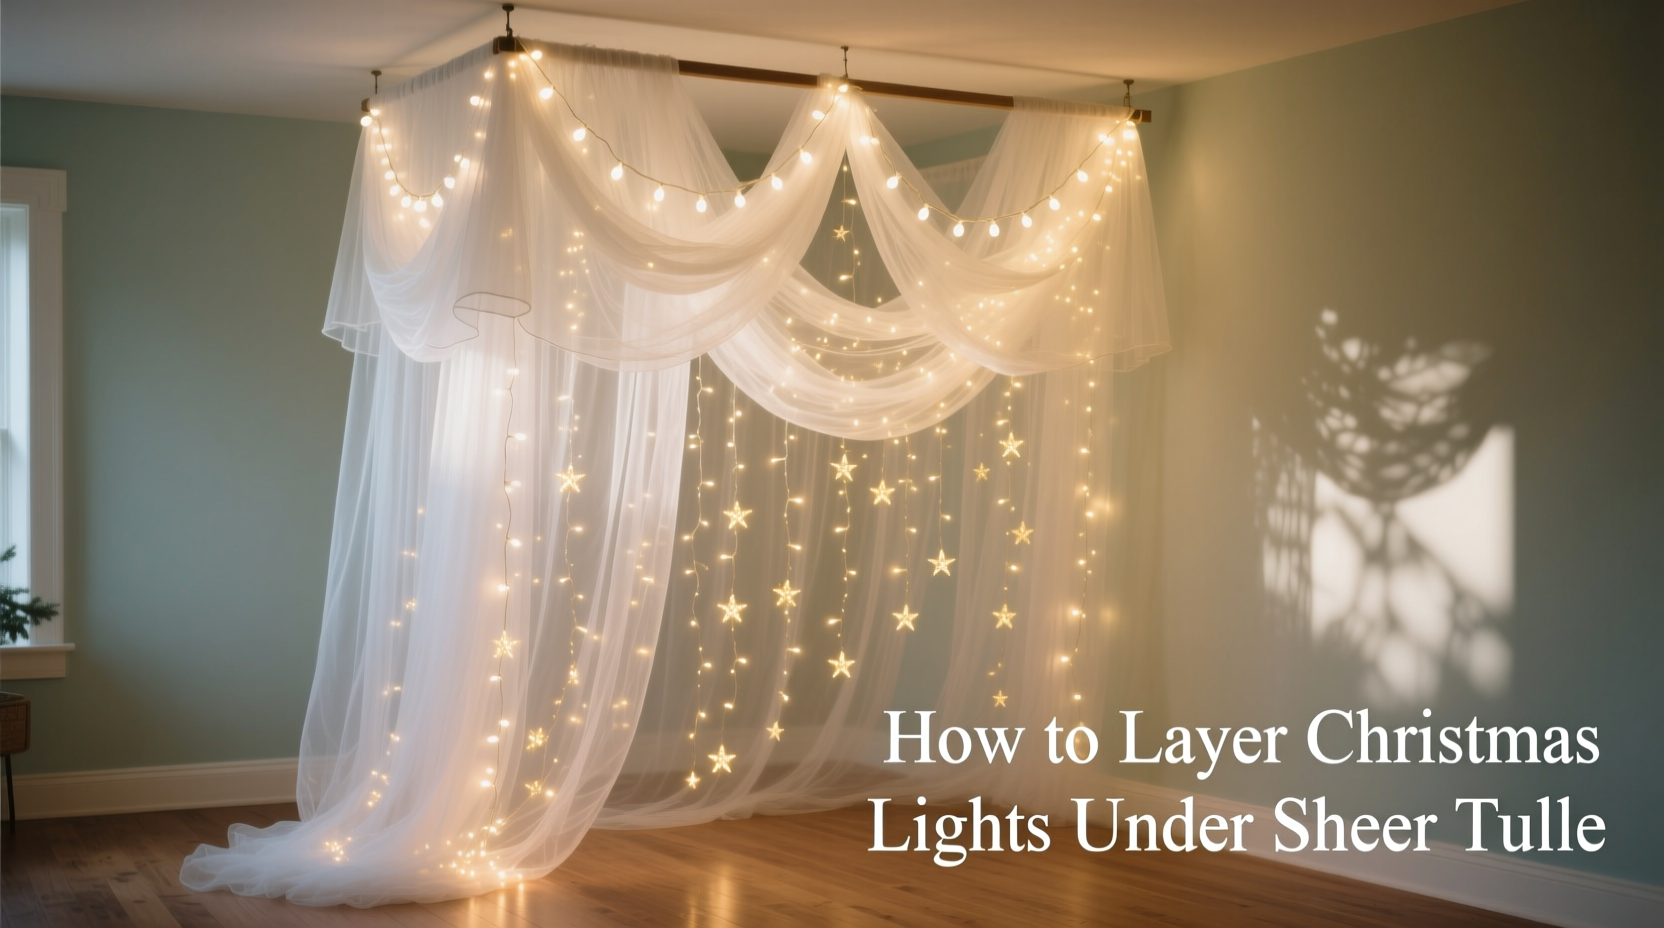
Sheer tulle is inherently translucent, allowing light to pass through while scattering it gently. When placed over Christmas lights, the fabric acts as a natural diffuser, eliminating harsh glare and reducing the visibility of individual bulbs. This creates a continuous field of soft illumination rather than a series of bright points.
The texture of tulle also contributes to the visual effect. Its fine mesh catches and refracts light in subtle ways, producing a shimmer that changes slightly depending on viewing angle and distance. This dynamic quality makes the display feel alive—almost breathing with ambient warmth.
Interior designer Mariah Delaney, known for her minimalist holiday aesthetics, explains:
“Tulle doesn’t compete with the light—it enhances it. It’s like giving the room a gentle veil, where the mood shifts from ‘decorated’ to ‘enchanted.’”
Choosing the Right Materials
Not all tulle and not all lights produce the same results. To achieve a truly dreamy effect, material selection matters deeply.
| Material | Recommended Type | Avoid |
|---|---|---|
| Tulle | White or off-white polyester tulle (6–9 yards per window/wall) | Stiff, heavily starched tulle; colored tulle unless intentional |
| Lights | Warm white LED mini lights (battery or plug-in) | Cool white or multicolored sets; large C7/C9 bulbs |
| Mounting Tools | Command hooks, clear clips, or adhesive tape | Nails, staples, or anything that damages surfaces |
For tulle, opt for lightweight, loosely woven fabric. Heavy bridal tulle may block too much light, defeating the purpose of diffusion. A width of 54–72 inches is ideal for vertical drops, while longer lengths allow for gathering and ruching, which increases depth and texture.
When selecting lights, prioritize warm white LEDs. They emit a softer, golden-toned glow compared to cool white, which can appear clinical under fabric. Mini lights (often called fairy lights) are preferred because their small size blends seamlessly once covered. Ensure they’re energy-efficient and low-heat—safety is paramount when layering near fabric.
Tip: Test your setup before final installation. Drape a sample of tulle over your lit strand in daylight and at night to observe how the diffusion changes.Step-by-Step Installation Guide
Creating the dreamy layered effect follows a deliberate sequence. Rushing any step can lead to uneven lighting, sagging fabric, or visible hardware.
- Measure and plan your coverage area. Use a measuring tape to determine the height and width of the surface—window frame, wall section, ceiling span, etc. Add 20–30% extra length and width to allow for gathering and overlap.
- Install mounting points for lights. Use removable adhesive hooks or clips spaced every 12–18 inches along the top edge. For ceilings, consider using tension rods across corners to support horizontal runs.
- String the lights evenly. Begin at the power source and lay out the strand in straight, parallel lines. Avoid crossing wires or clustering bulbs. If using multiple strands, connect them end-to-end rather than stacking.
- Secure the tulle base layer (optional). For maximum diffusion, attach a flat layer of tulle directly behind the lights—especially effective on windows. Pin or tape edges to the frame, ensuring no wrinkles.
- Drape the primary tulle layer. Take your main piece of tulle and gather it slightly along the top edge. Attach it above the lights using decorative curtain rods, tension wires, or adhesive hooks. Let it fall naturally over the illuminated area.
- Add volume with ruching or pleating. Gently pinch and pull sections of the tulle downward, securing them at intervals with hidden clips. This creates folds that catch light differently, enhancing depth.
- Adjust and refine after dark. Turn on the lights once everything is in place. Walk around the space and tweak folds or reposition bulbs that appear too bright or dim.
For ceiling installations, consider suspending lights from fishing line tied between push pins or Command hooks. Hang tulle from a central ring or hoop for a canopy effect—perfect above beds or dining tables.
Real-Life Example: A Cozy Bedroom Transformation
Jenna, a schoolteacher in Portland, wanted to create a calming holiday atmosphere in her bedroom without overwhelming her neutral decor. She chose a large arched window flanked by crown molding and decided to transform it into a glowing focal point.
She measured the window (5 feet wide, 7 feet tall), purchased 8 yards of ivory tulle, and strung two 50-light warm white LED strands horizontally across the top third and middle section. Using clear plastic clips, she secured the wires to the frame. Then, she draped the tulle from a thin wooden rod mounted just above the arch.
After initial installation, she noticed hotspots near the plug end. By redistributing the tulle with deeper gathers in those areas and adding a second vertical run of lights on one side, she balanced the glow. The final result was a softly luminous arch that cast delicate shadows across the ceiling each evening—a personal retreat that guests consistently complimented.
Common Mistakes and How to Avoid Them
- Using too few lights. Sparse strands become obvious under fabric, creating patchy illumination. Aim for at least 100 bulbs per 4 square feet of coverage.
- Over-gathering the tulle. While folds add texture, excessive bunching blocks light and looks messy. Keep gathers loose and asymmetrical for a natural flow.
- Ignoring heat buildup. Even LED lights generate minor heat. Never sandwich lights tightly between thick layers of fabric. Always allow airflow, especially near outlets or enclosed spaces.
- Choosing the wrong color temperature. Cool white lights (5000K+) make tulle appear bluish and sterile. Stick to 2700K–3000K for warmth.
- Skipping safety checks. Inspect cords for fraying, avoid overloading circuits, and never leave lights unattended for long periods.
Advanced Tips for Maximum Impact
Once you’ve mastered the basics, consider these enhancements to deepen the dreaminess:
- Layer multiple sheets. Use two or three overlapping pieces of tulle with slight offsets. Each layer further softens the light and adds complexity to the texture.
- Incorporate sheer ribbons or lace. Intermix narrow strips of vintage lace or satin ribbon into the tulle drape for subtle contrast and vintage charm.
- Use dimmable lights. Install smart or remote-controlled string lights to adjust brightness based on time of day or mood.
- Add scent subtly. Lightly spritz the back of the tulle with a winter-themed linen spray (e.g., pine, vanilla). Avoid direct contact with bulbs.
- Pair with reflective surfaces. Position near mirrors or glass to amplify the glow and extend the illusion of space.
“The best holiday lighting doesn’t shout—it whispers. When you can feel the warmth before you even see the source, you know you’ve got it right.” — Lucas Reed, Lighting Designer & Author of *Ambient Seasons*
Frequently Asked Questions
Can I leave the lights on overnight?
Modern LED string lights are generally safe for extended use, especially if they remain cool to the touch. However, for peace of mind and energy efficiency, use lights with built-in timers or smart controls that turn off automatically after 6–8 hours.
Will the tulle yellow over time from the light heat?
Prolonged exposure to heat and UV (even minimal from LEDs) can cause white fabrics to yellow. To prevent this, limit daily usage to 8–10 hours and store tulle clean and folded after the season. Washing before storage removes dust and oils that accelerate discoloration.
Can this be done outdoors?
Only if both the lights and tulle are rated for outdoor use. Standard tulle degrades quickly in moisture and wind. For patios or porches, use weather-resistant sheer mesh and outdoor-safe, insulated string lights. Secure all elements against gusts and avoid direct rain exposure.
Essential Checklist Before You Begin
- ☐ Measure your space accurately
- Include height, width, and depth for 3D installations.
- ☐ Purchase warm white LED mini lights
- Ensure sufficient bulb count for even coverage.
- ☐ Choose lightweight, high-quality tulle
- Buy extra yardage for gathering and adjustments.
- ☐ Gather non-damaging mounting tools
- Command hooks, clear clips, tension rods, or adhesive tapes.
- ☐ Test the setup during daytime and nighttime
- Observe diffusion, brightness, and shadow patterns.
- ☐ Plan for storage post-holiday
- Roll tulle around a cardboard tube; coil lights neatly to prevent tangling.
Conclusion: Create Your Own Enchanted Space
Layering Christmas lights under sheer tulle isn’t just decoration—it’s an act of atmosphere-building. It invites slowness, wonder, and quiet joy into spaces that often rush through the season. With careful planning and attention to light quality, fabric choice, and placement, you can transform ordinary rooms into dreamlike sanctuaries.
This technique proves that holiday magic doesn’t require extravagance. Sometimes, it’s simply about how light moves through a fold of fabric, or how a single warm glow can redefine a corner of your home. Start small—a bedroom window, a headboard drape, a closet-turned-nook—and let the soft radiance inspire the rest.
💬 Try this technique and share your results! Did a certain tulle color enhance the mood? What surprised you about the final glow? Leave a comment and inspire others to create their own luminous retreats.