Stair railings offer one of the most visible and dramatic backdrops in your home during the holidays. When dressed with layered Christmas garlands, they transform into a centerpiece that draws the eye and sets the festive tone. Yet, many homeowners drape garlands haphazardly—too sparse, too tangled, or lacking depth—missing the opportunity for a truly professional look. The secret isn’t just in the materials you use, but in how you layer, drape, and secure them. With thoughtful planning and attention to detail, you can achieve a lush, full, and balanced display that looks as if it was styled by an interior designer.
Selecting the Right Garlands
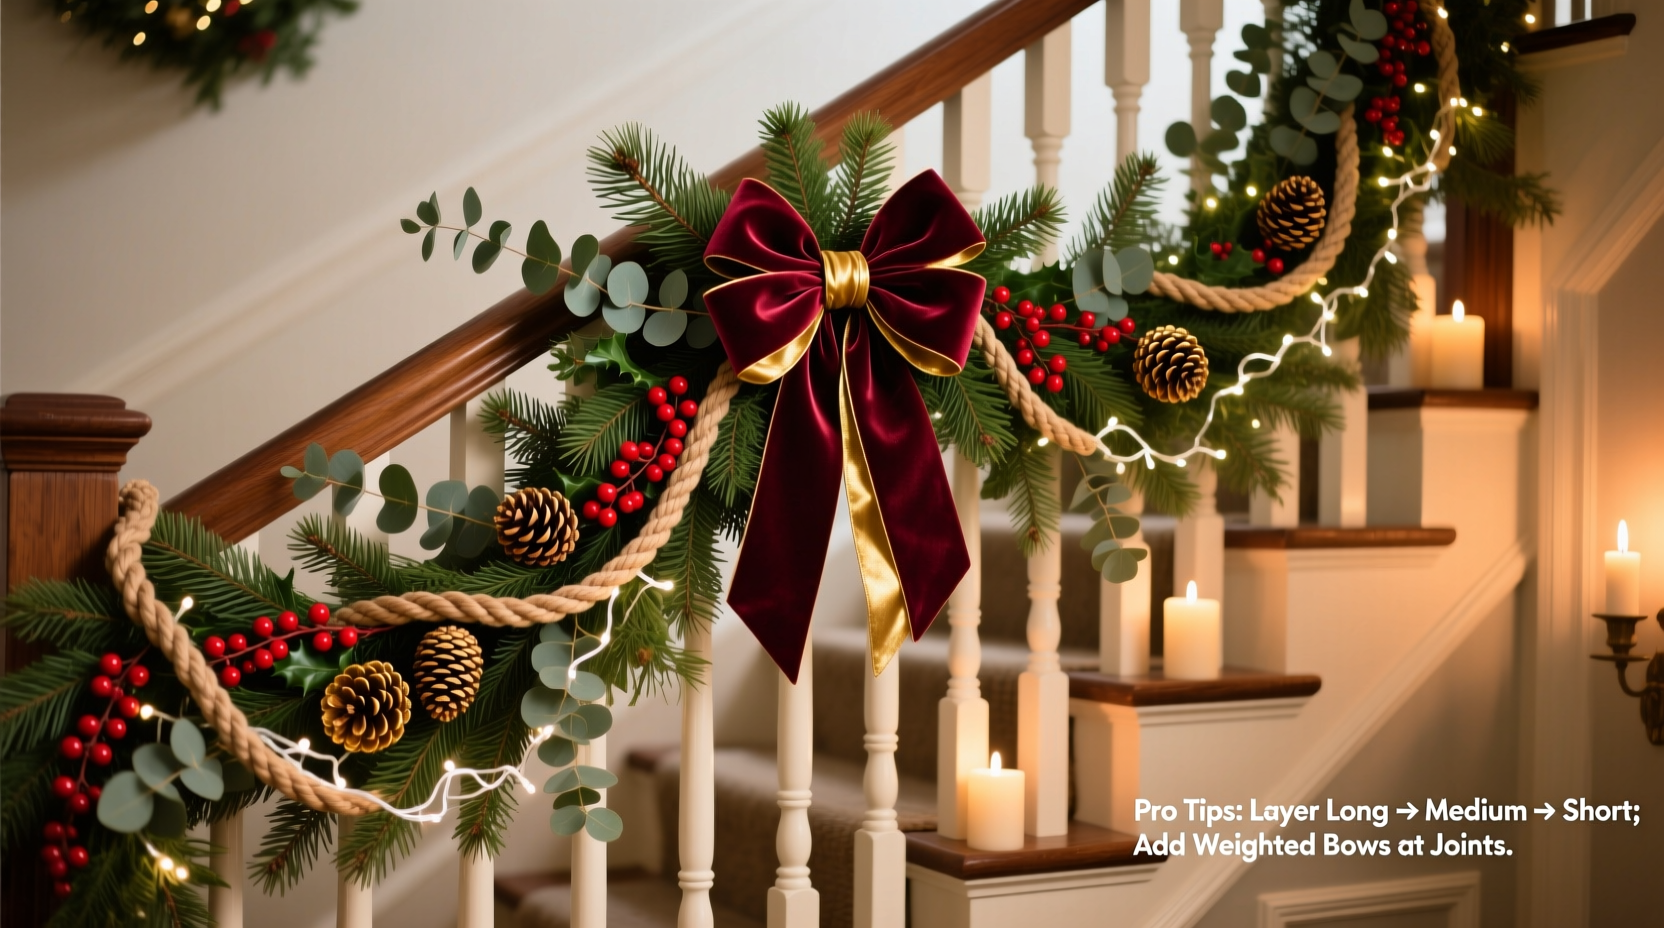
The foundation of a pro-level garland display begins with choosing the right types. Not all garlands are created equal—some are better suited for structure, others for texture or color accents. A layered approach typically combines three types: base greenery, accent garlands, and decorative strands.
- Natural greenery garlands (e.g., fir, pine, eucalyptus) provide volume and a fresh scent. These work best as the base layer.
- Faux garlands with realistic texture offer consistency and durability, especially useful if you plan to reuse them year after year.
- Berried or berry-dotted garlands add pops of red, white, or gold and break up solid green tones.
- Lights-only strands or tinsel garlands serve as shimmering overlays that catch light and create visual interest.
Planning Your Layering Strategy
Before hanging anything, assess your staircase. Consider length, railing height, curvature, and surrounding décor. A straight staircase allows for symmetrical draping, while curved or spiral stairs may require more flexible garlands and careful spacing.
Decide on your color palette early. Traditional red and green schemes benefit from warm white lights and natural pine. For modern aesthetics, try silver, white, and blue with cool LED lighting and frosted evergreen accents. Whatever your theme, consistency across layers is key.
“Layering is about rhythm and balance. You want the eye to travel smoothly along the railing, not get stuck on clumps or gaps.” — Lila Montgomery, Interior Stylist & Holiday Décor Consultant
Step-by-Step Guide to Layering Garlands
- Measure your railing. Use a soft tape measure along the handrail’s path. Add 10–15% extra length to allow for draping and swags.
- Install the base greenery. Start with a full, natural or high-quality faux garland. Secure every 12–18 inches using floral wire or clear zip ties. Avoid twisting—keep the greenery facing outward and upward for maximum visibility.
- Add a second layer of textured garland. Choose one with berries, pinecones, or dried citrus slices. Offset this layer slightly so it doesn’t sit directly on top, allowing both textures to show.
- Weave in string lights. Use pre-lit garlands or wrap separate light strands around the base. Warm white LEDs are most flattering; space bulbs evenly. Test lights before installation.
- Incorporate a third decorative strand. This could be a burlap ribbon, metallic tinsel, or oversized satin bow trail. Attach intermittently rather than continuously for elegance.
- Create swags at intervals. Gently pull sections downward every 2–3 feet to form U-shaped dips. Secure the lowest point with a discreet hook or wire to maintain shape.
- Fill gaps with supplemental elements. Tuck in small pinecone clusters, cinnamon sticks, or mini ornaments where coverage feels thin.
- Step back and evaluate. View from multiple angles—bottom of stairs, top, and adjacent rooms. Adjust symmetry and fullness as needed.
Do’s and Don’ts of Garland Layering
| Do’s | Don’ts |
|---|---|
| Use floral wire or clear zip ties for secure, invisible fastening | Rely solely on loose draping—garlands will sag or slip |
| Vary textures and diameters between layers | Use three identical-looking garlands—they’ll blend into a flat mass |
| Test lights before attaching | Plug in untested strands—burned-out bulbs ruin continuity |
| Create even swags for rhythm | Let garlands hang straight down like ropes—adds no visual interest |
| Balance ornamentation—don’t overload one section | Cluster all decorations at the top or bottom |
Real Example: A Classic Colonial Staircase Transformation
Sarah, a homeowner in Concord, Massachusetts, wanted to elevate her traditional colonial home’s holiday look. Her wide, straight staircase had previously been adorned with a single strand of tired artificial pine and mismatched colored lights. After consulting a local décor stylist, she adopted a layered approach.
She began with a 20-foot premium faux Douglas fir garland as the base, secured with galvanized floral wire every 15 inches. Over this, she added a second garland featuring faux red berries and frosted pinecones, offset by six inches along the railing. Next, she wrapped a 25-foot warm white LED strand around both layers, ensuring even glow without dark spots. Finally, she attached 3-inch-wide velvet red ribbons every 36 inches, tied into elegant bows and allowed to cascade down the sides.
The result? A rich, inviting display that guests described as “magazine-worthy.” Neighbors began asking for advice, and Sarah now hosts an annual holiday open house centered around her staircase décor.
Essential Tools and Materials Checklist
To execute a professional garland layering job, gather these items before you begin:
- Measuring tape
- Base garland (natural or high-quality faux)
- Accent garland (textured or berried)
- String lights (preferably warm white LED)
- Decorative ribbon or tinsel strand
- Floral wire (22-gauge) or clear plastic zip ties
- Scissors or wire cutters
- Small hooks or adhesive mounts (for swag support)
- Ornaments or supplemental décor (optional)
- Ladder or step stool (if needed)
Maintaining Your Display Throughout the Season
A beautifully layered garland shouldn’t degrade after a week. Natural garlands dry out and shed, while lights flicker and ribbons loosen. Pro decorators know maintenance is part of the process.
If using real greenery, mist lightly every few days with water to preserve freshness. Avoid over-spraying near electrical components. Check connections weekly—replace any burnt-out bulbs immediately. Inspect attachment points: wires can stretch, and zip ties may crack in cold temperatures.
For homes with children or pets, ensure no dangling cords pose a tripping or chewing hazard. Consider using battery-operated lights on lower sections for safety.
“Even the best installation fades if ignored. A five-minute weekly check keeps your display looking intentional through New Year’s.” — Marcus Tran, Professional Holiday Stylist, Chicago
FAQ
How many garlands should I use for layering?
Three layers produce the most professional result: a base greenery garland, a textured or berried accent, and a lights or ribbon overlay. Two layers work for narrower railings or minimalist styles, but avoid going beyond three unless your railing is exceptionally wide.
Can I mix real and fake garlands?
Absolutely—and it’s often recommended. Pair a real greenery base with a durable faux accent garland. The natural scent and texture of real foliage combine well with the longevity and consistency of artificial elements. Just ensure both have similar diameters for cohesive blending.
How do I prevent garlands from slipping or sagging?
Secure every 12–18 inches using floral wire twisted tightly around the railing. For heavier garlands, double-wrap the wire or use small screw-in hooks for additional support at swag points. Avoid rubber bands or tape, which lose adhesion over time.
Final Touches and Creative Variations
Once your layers are installed, personalize the look. Some opt for themed ornaments—mini sleds, tiny presents, or wooden stars—spaced evenly along the railing. Others incorporate family heirlooms, like vintage glass baubles or handmade crafts, for sentimental value.
For a wintry feel, lightly spray sections with artificial snow or glitter (use sparingly and only on non-lighted areas). In coastal regions, swap pine for eucalyptus and add seashell accents for a nautical twist. Urban lofts might prefer monochrome garlands in black, white, and silver with geometric ornaments.
The goal is cohesion: every element should support the overall theme without competing for attention. Less is often more when it comes to accessories—let the layered greenery remain the star.
Conclusion
Layering Christmas garlands around stair railings isn’t about complexity—it’s about intention. By selecting complementary materials, following a logical sequence, and securing each layer with care, you can achieve a look that radiates warmth, elegance, and holiday cheer. Whether your style is rustic farmhouse or sleek modern, the principles of balance, texture, and rhythm apply universally.
This season, go beyond basic draping. Treat your staircase as a canvas and your garlands as brushstrokes. With the right approach, your home won’t just be decorated—it will be transformed.
💬 Have a favorite garland combination or pro tip? Share your experience in the comments and inspire others to elevate their holiday décor!