Vintage Christmas ornaments carry more than holiday cheer—they hold memories, craftsmanship, and often decades of family tradition. Whether inherited from a grandparent or discovered in an attic treasure hunt, these delicate decorations deserve careful handling. Over time, dust, grime, and oxidation can dull their brilliance, but improper cleaning can cause irreversible damage. The key lies in understanding the materials involved and applying gentle, targeted techniques. With the right approach, you can restore their luster while preserving their integrity for future generations.
Understanding Vintage Ornament Materials
Vintage ornaments span a wide range of eras—from early 20th-century glass baubles to mid-century plastic novelties—and each material responds differently to cleaning agents and physical handling. Identifying what your ornament is made of is the first and most critical step before any cleaning begins.
Common materials include:
- Glass (often mercury glass or hand-blown): Frequently found in European-made ornaments from the 1920s–1950s. These may have painted surfaces, foil lining, or delicate tinsel inserts.
- Metal (tin, aluminum, or stamped steel): Popular in mid-century American ornaments, especially character figures like Santa or snowmen.
- Plastic (early celluloid or later PVC): Common in post-war production. Celluloid is flammable and degrades over time; PVC may become sticky or cloudy.
- Felt, fabric, or cardboard: Often used in handmade or Depression-era ornaments. Highly sensitive to moisture and friction.
- Wood: Typically carved or lathe-turned, sometimes with paint or varnish. Prone to warping if exposed to moisture.
Misidentifying the material can lead to disaster. For example, submerging a celluloid ornament in water may cause it to crack or emit hazardous fumes. Similarly, rubbing a painted glass surface too hard can remove irreplaceable detailing.
Tip: When in doubt about material type, start with the gentlest method—dry brushing—and test on a small, inconspicuous area first.Step-by-Step Cleaning Process by Material Type
Cleaning vintage ornaments isn’t a one-size-fits-all task. Each material demands a tailored strategy. Follow this structured timeline to ensure safety and effectiveness.
- Inspect: Examine the ornament under natural light. Look for cracks, flaking paint, loose parts, or signs of mold.
- Identify: Determine the primary material using visual cues, weight, and sound (glass clinks, plastic taps softly).
- Prepare: Gather soft tools: microfiber cloths, cotton swabs, a soft-bristle brush (like a makeup or artist’s brush), and distilled water.
- Clean: Apply the appropriate method based on material (detailed below).
- Dry: Allow air drying away from direct heat or sunlight.
- Store: Place in acid-free tissue with proper cushioning.
Cleaning Glass Ornaments
Many vintage glass ornaments are coated internally with silvering or metallic powder and externally with painted designs. Never soak them. Instead:
- Use a soft makeup brush to gently dislodge dust from crevices.
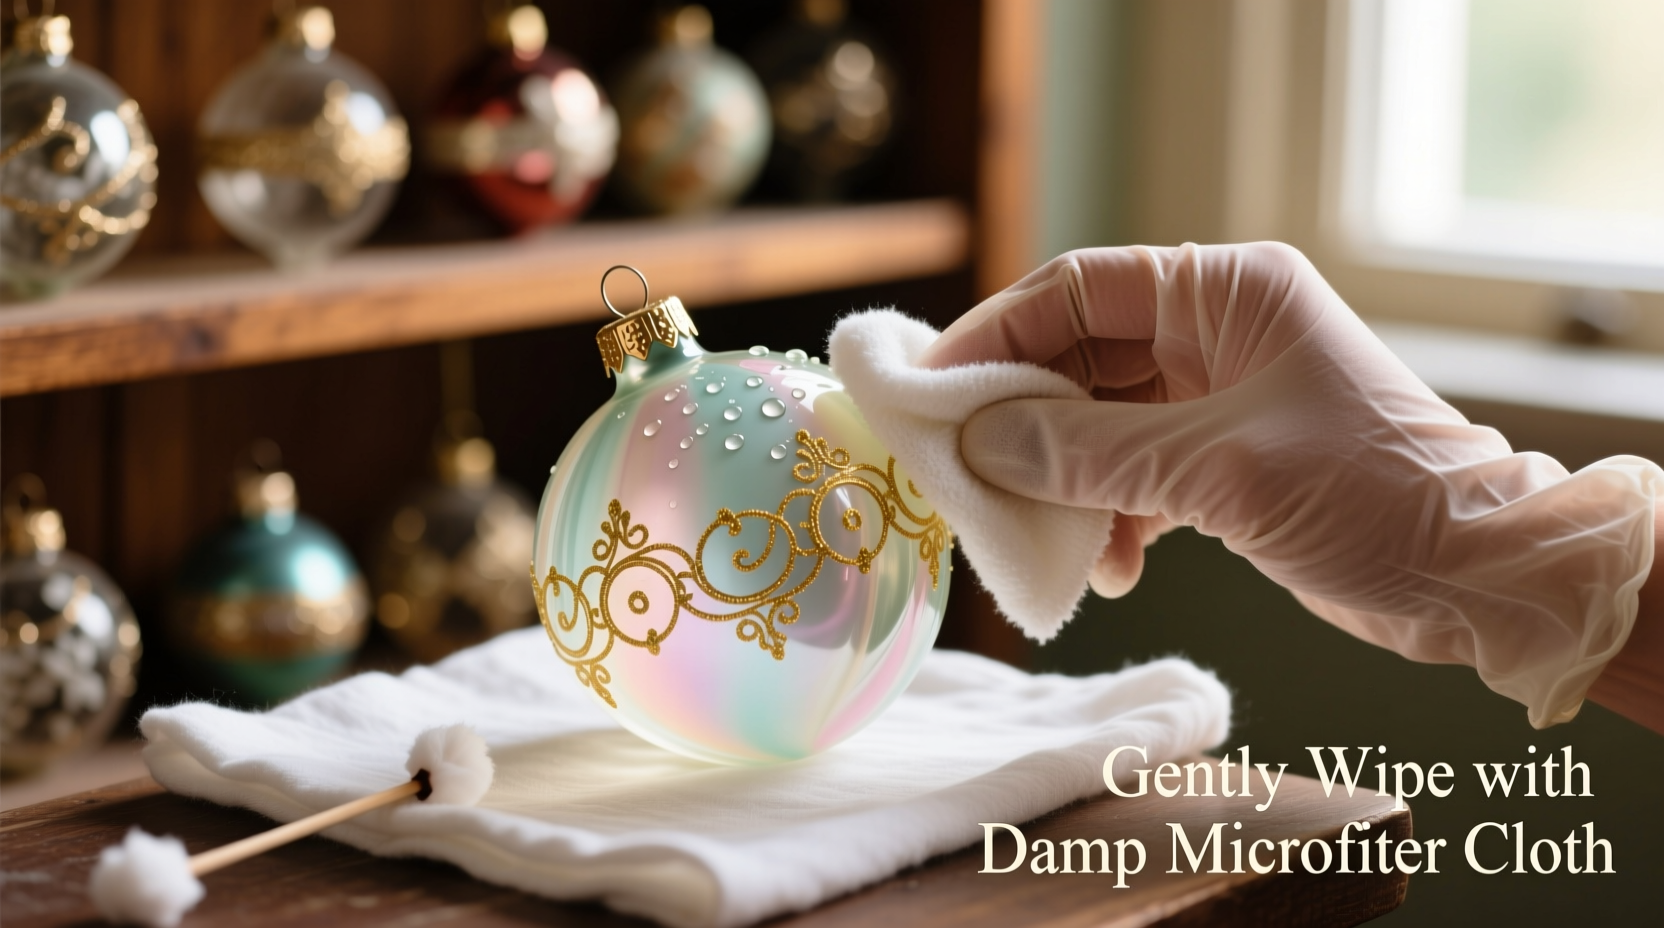
- Dampen a corner of a microfiber cloth with distilled water and lightly dab the surface. Avoid circular rubbing.
- For stubborn spots, mix one drop of mild dish soap (phosphate-free) with a cup of distilled water. Dip a cotton swab, wring thoroughly, and spot-clean only.
- Rinse by dabbing with a water-dampened cloth, then immediately dry with a lint-free towel.
If the ornament has a separate cap or hook, clean it separately with a jewelry polishing cloth.
Caring for Metal Ornaments
Tin or aluminum ornaments often suffer from surface oxidation. Do not use commercial metal polishes—they strip original finishes.
- Dust with a soft brush.
- For light tarnish, use a pencil eraser (preferably white vinyl) and gently rub in one direction. This removes oxidation without scratching.
- Wipe with a barely damp cloth if needed, then dry immediately.
- Never immerse in liquid; moisture trapped in seams causes rust.
Handling Plastic Ornaments
Celluloid and early plastics degrade chemically over time. Signs include a vinegar-like smell, stickiness, or web-like cracking (“crazing”).
- Dust only with a soft brush. Do not wet clean.
- If sticky, place in a sealed container with activated charcoal or baking soda for 48 hours to absorb oils.
- Avoid alcohol, acetone, or window cleaners—these accelerate breakdown.
“Vintage plastics are among the most unstable materials in decorative arts. Their deterioration is chemical, not just cosmetic.” — Dr. Laura Mitchell, Conservation Scientist, Smithsonian Institution
Fabric, Felt, and Cardboard Ornaments
These porous materials absorb moisture and can harbor mold. Wet cleaning is rarely advisable.
- Use a soft brush or vacuum with a brush attachment on low suction, held at least an inch away.
- If stained, consult a textile conservator. DIY attempts often set stains permanently.
- Never spray or wipe with liquid.
Do’s and Don’ts: A Quick Reference Table
| Material | Do | Don't |
|---|---|---|
| Glass | Dust gently; spot-clean with distilled water | Soak; use abrasive cloths |
| Metal | Use pencil eraser for tarnish; dry wipe | Apply commercial polish; immerse in water |
| Plastic (vintage) | Dust lightly; store with absorbents | Wet clean; use alcohol |
| Fabric/Felt | Brush or vacuum gently from a distance | Spray with cleaner; rub stains |
| Wood | Dust with dry cloth; condition with beeswax (sparingly) | Expose to humidity; use oil-based polishes |
Real Example: Restoring a 1940s German Tinsel Ball
Martha K., a collector from Ohio, inherited a set of 1940s German tinsel balls from her mother. The ornaments had dulled significantly, their internal tinsel matted and obscured by grime. Eager to restore them, she nearly soaked them in soapy water—until consulting a museum conservator.
The correct approach:
- She used a fine-tipped paintbrush to gently separate tinsel strands from outside the opening.
- Compressed air (from a camera lens blower) removed dust trapped between layers.
- For the exterior glass, she applied a microfiber cloth with a single drop of distilled water and mild soap, wiped once, then dried immediately.
The result? Sparkling ornaments that retained their original shimmer and historical value. Martha now displays them on a dedicated heirloom tree each year.
Essential Checklist for Safe Ornament Cleaning
Before starting, gather your supplies and follow this checklist to avoid mishaps:
- ✅ Work in a well-lit, clutter-free space
- ✅ Wear cotton gloves to prevent oil transfer from fingers
- ✅ Use only soft tools: microfiber cloths, makeup brushes, cotton swabs
- ✅ Test cleaning method on a small, hidden area first
- ✅ Keep water and cleaning solutions minimal and contained
- ✅ Label each ornament after cleaning to avoid repeat treatment
- ✅ Store cleaned ornaments separately until fully dry
When Not to Clean: Preserving Patina and Integrity
Not all discoloration is damage. Some collectors and historians value patina—the natural aging of surfaces—as part of an ornament’s story. Over-cleaning can strip historical authenticity and reduce collectible value.
Consider leaving an ornament uncleaned if:
- It has stable, even discoloration (e.g., uniform tarnish on metal).
- Paint loss reveals underlying detail or construction method.
- It’s extremely fragile (e.g., cracked glass, crumbling edges).
- You’re unsure of its composition or provenance.
In such cases, stabilization—such as dust removal and safe storage—is preferable to restoration.
FAQ: Common Questions About Cleaning Vintage Ornaments
Can I use vinegar or lemon juice to clean glass ornaments?
No. While natural, acidic solutions like vinegar can etch glass surfaces and damage paint or metal components. Stick to distilled water and mild, pH-neutral soap if needed.
My ornament smells like vinegar. Is it ruined?
It likely contains degrading celluloid. The smell indicates off-gassing of acetic acid. Isolate the ornament in a ventilated area away from other items. Do not attempt to clean it with liquids. Consider professional conservation if it has sentimental or monetary value.
How should I store cleaned vintage ornaments?
Wrap each in acid-free tissue paper and place in individual compartments within a rigid box. Avoid plastic bags, which trap moisture. Store in a cool, dry, dark place with stable temperature—ideally 60–70°F and 40–50% humidity.
Conclusion: Honor the Past, One Ornament at a Time
Cleaning vintage Christmas ornaments is an act of care, not just maintenance. It’s a way to honor family history, preserve artistry, and pass beauty forward. By approaching each piece with patience and respect, you protect not only its physical form but also the emotional weight it carries. Every speck of dust removed is a gesture toward continuity—a quiet promise that these treasures will continue to shine, season after season.
💬 Have a vintage ornament with a unique story or cleaning challenge? Share your experience in the comments—your insight could help others preserve their own holiday heirlooms.